2021 5/5 コードのsamtoolsへパイプする部分でWSLのランがエラーになったため、改行を除去
2021 5/9 画像追加
Nextflowなどのworkflow managerを使って解析パイプラインを記述しておくことで、再現性のある解析が可能になります。午後の空き時間を使って簡単なコードを書いてみました。
Nextflow: omics解析のような大規模な生物学的解析向けのワークフロー管理システム。Nextflowはリアクティブプログラミングを採用しており、非同期性の計算を単純なコードで記述できる。
HP
Documentatiobn
https://www.nextflow.io/docs/latest/index.html
インストール
依存(installより)
- Nextflow can be used on any POSIX compatible system (Linux, OS X, etc). It requires Bash 3.2 (or later) and Java 8 (or later, up to 15) to be installed.
- For the execution in a cluster of computers the use a shared file system is required to allow the sharing of tasks input/output files.
- Windows system is supported through WSL.
wget -qO- https://get.nextflow.io | bash
chmod +x nextflow
sudo mv nextflow /usr/local/bin/

#もしくはcondaに管理させる (bioconda)
mamba install -c bioconda nextflow -y
> nextflow -h
$ nextflow -h
Usage: nextflow [options] COMMAND [arg...]
Options:
-C
Use the specified configuration file(s) overriding any defaults
-D
Set JVM properties
-bg
Execute nextflow in background
-c, -config
Add the specified file to configuration set
-d, -dockerize
Launch nextflow via Docker (experimental)
-h
Print this help
-log
Set nextflow log file path
-q, -quiet
Do not print information messages
-syslog
Send logs to syslog server (eg. localhost:514)
-v, -version
Print the program version
Commands:
clean Clean up project cache and work directories
clone Clone a project into a folder
config Print a project configuration
console Launch Nextflow interactive console
drop Delete the local copy of a project
help Print the usage help for a command
info Print project and system runtime information
kuberun Execute a workflow in a Kubernetes cluster (experimental)
list List all downloaded projects
log Print executions log and runtime info
pull Download or update a project
run Execute a pipeline project
self-update Update nextflow runtime to the latest available version
view View project script file(s)
> nextflow run -h
$ nextflow run -h
Execute a pipeline project
Usage: run [options] Project name or repository url
Options:
-E
Exports all current system environment
Default: false
-ansi-log
Enable/disable ANSI console logging
-bucket-dir
Remote bucket where intermediate result files are stored
-cache
Enable/disable processes caching
-dsl2
Execute the workflow using DSL2 syntax
Default: false
-dump-channels
Dump channels for debugging purpose
-dump-hashes
Dump task hash keys for debugging purpose
Default: false
-e.
Add the specified variable to execution environment
Syntax: -e.key=value
Default: {}
-entry
Entry workflow name to be executed
-h, -help
Print the command usage
Default: false
-hub
Service hub where the project is hosted
-latest
Pull latest changes before run
Default: false
-lib
Library extension path
-main-script
The script file to be executed when launching a project directory or
repository
-name
Assign a mnemonic name to the a pipeline run
-offline
Do not check for remote project updates
Default: false
-params-file
Load script parameters from a JSON/YAML file
-process.
Set process options
Syntax: -process.key=value
Default: {}
-profile
Choose a configuration profile
-qs, -queue-size
Max number of processes that can be executed in parallel by each executor
-resume
Execute the script using the cached results, useful to continue
executions that was stopped by an error
-r, -revision
Revision of the project to run (either a git branch, tag or commit SHA
number)
-test
Test a script function with the name specified
-user
Private repository user name
-with-conda
Use the specified Conda environment package or file (must end with
.yml|.yaml suffix)
-with-dag
Create pipeline DAG file
-with-docker
Enable process execution in a Docker container
-N, -with-notification
Send a notification email on workflow completion to the specified
recipients
-with-podman
Enable process execution in a Podman container
-with-report
Create processes execution html report
-with-singularity
Enable process execution in a Singularity container
-with-timeline
Create processes execution timeline file
-with-tower
Monitor workflow execution with Seqera Tower service
-with-trace
Create processes execution tracing file
-with-weblog
Send workflow status messages via HTTP to target URL
-without-docker
Disable process execution with Docker
Default: false
-without-podman
Disable process execution in a Podman container
-w, -work-dir
Directory where intermediate result files are stored
テストコード
今回は7組あるペアエンドfastqについて以下の計算処理を行う。
- process preprocessing:trim_galoreを使ってペアエンドfastqのアダプタートリミングとクオリティフィルタリングを実行。オプションのfastqcの分析も行う。
- process mapping:前処理したペアエンドfastqを受け取り、minimap2を使ってリファレンスゲノムにマッピング、samtools sortにパイプしてcoordinate_sorted.bamを出力。
- process statistics:ソートされたbamを受け取り、samtools flagstatコマンドを使ってbamの要約統計を出力。
これを実行するために、以下のコードをvariant-call.nfとして保存


(実際のコードは一番下に貼ってあります)
環境作成
Nextflow自身にcondaの環境を作らせてランさせることもできますが、今回は前もって環境を作り、ツールも導入しておきます。
mamba create -n nextflowtest python=3.6 -y
conda activate nextflowtest
mamba install -c bioconda trim-galore -y
mamba install -c bioconda minimap2 -y
mamba install -c bioconda samtools -y
mamba install -c bioconda multiqc -y
ディレクトリ構造
現在のパス($baseDi)から見たディレクトリ構造が下の写真になります。入力データであるfastq.gzファイルはfastq ディレクトリに配置し、fasta形式のリファレンス配列はreferenceディレクトリに配置しています。
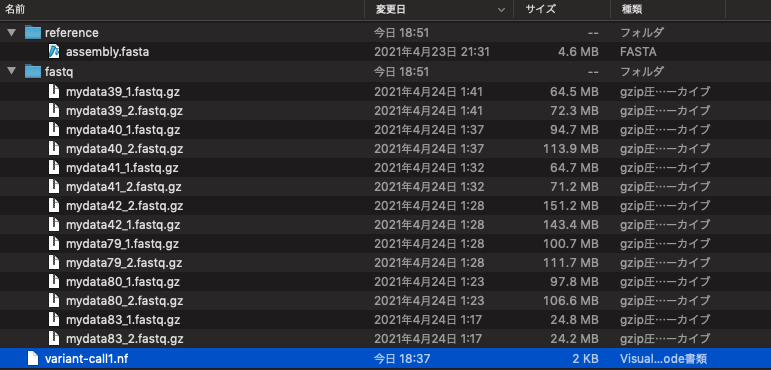
ファイル命名則はコードの
params.reads = "$baseDir/fastq/*_{1,2}.fastq.gz"
に記載されている通り、xxx_1.fastq.gzとxxx_2.fastq.gzになっている必要があります(1組以上あれば何組でも認識されます)。
ラン
準備ができたのでnextflowのコードを実行します。ここでは各プロセスのランタイムをタイムラインに沿って視覚化してくれる-with-timelineフラグをつけてランします。
nextflow variant-call1.nf -with-timeline

#おまけ。最後にmultiqcをラン。
multiqc .
- -with-timeline Create processes execution timeline file
作業ディレクトリ:workに各プロセスの結果は出力されていきます。作業ディレクトリ名は"-w <working_dir>"で変更できます。
ラン終了。3つのプロセス全てが正常に終わりました。トータルのCPU時間は0.4時間、トータルの計算時間は3分4秒でした。
N E X T F L O W ~ version 20.10.0
Launching `variant-call1.nf` [lethal_spence] - revision: 6c5a847653
executor > local (21)
[39/b0f876] process > preprocessing (mydata42) [100%] 7 of 7 ✔
[92/87bc25] process > mapping (mydata42) [100%] 7 of 7 ✔
[03/cb9621] process > statistics (mydata42) [100%] 7 of 7 ✔
Completed at: 03-5月-2021 19:20:12
Duration : 3m 49s
CPU hours : 0.4
Succeeded : 21
出力
上のコードでは、出力をresults/の3つのサブディレクトリにコピーするように書いていますので、resultsのサブディレクトリに結果が保存されています(作業ディレクトリにも同じファイルがあります)。タイムラインレポートのtimeline.htmlファイルも生成されています(写真の一番下)。

timeline.html
タイムラインHTMLは、プロセスが実行された順番に上から下に並んでいます。 3つのステップそれぞれで7つのデータを受け取って計算しているので、合計で21個あります。横軸がタイムラインテーブルです。タイムテーブルでの相対的な開始位置と終了位置が把握できるようになっています。
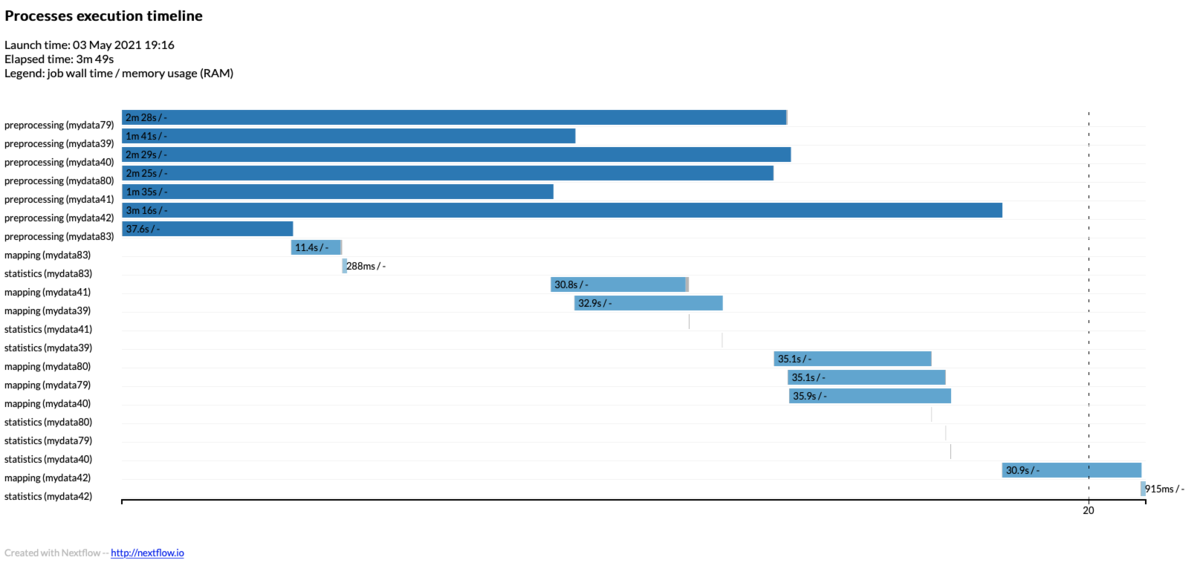
最初の6プロセス(いずれもtrim_galore)が計算時間の半分以上を占めています。trim_galoreはシングルスレッドの上、fastqcの分析オプションもつけてランしたので仕方ないのですが、全体のランタイムを減らすには、より高速な前処理ツールへ変更するのが有効そうです。
今回はmac mini の6コア12スレッドモデルを使って計算リソース制限なしで実行したので、nextflowからは12コア利用可能と認識されています。最初のプロセスはシングルスレッドのtrim_galoreによる前処理のため、nextflowは7組のfastqの前処理計算を同時に始めています。仮に1つのプロセスで4コア使うためにリソースの上限に達していると判断されると、まず3組のfastqの前処理が行われ、1つ終わったら1つ追加、という風に進みます。

上の写真を見ると、上から7つ目のpreprocessing (mydata83)だけ他のpreprocessingより早く計算が終了しています。これはmydata83のシークエンシング量が他のファイルよりかなり少なかったためです。このpreprocessing (mydata83)が終わるとすぐさまmapping (mydata83)プロセスが開始され、これもすぐに終わって最後のstatistics (mydata83)プロセスが開始されています。最後のstatistics (mydata83)プロセスも1秒以内に終了したため、mydata83だけは、タイムライン中盤付近で早くも全ての計算が終わったことになります(動画を見るとresults/のサブフォルダにこのデータの結果だけ早くコピーされています)。このように、nextflowが計算プロセス全体を管理し、リソースがフリーになりすぎないように、より効率的に計算を管理していることが分かりますね。
おまけ
NextflowのパイプラインはDirect Acyclic Graphでモデル化されている。グラフのノードはパイプラインのプロセスとオペレータを表し、エッジはそれらの間のデータ接続(すなわちチャンネル)を表す。 "-with-dag <.png>"をつけると DAGのワークフロー図を出力できる。macosなら”brew install graphviz”でgraphvizをインストールできる。
nextflow run test.nf -with-dag flowchart.png

最後に、128組のペアエンドfastq(別のデータ)を用意し、全てのfastqからの計算が終わるまでの時間を3990xの計算機とmac mini 2018で比較してみました。3990xはcore i7 8700の10倍以上のコア数を利用できるわけですが、ランタイムはどうなるでしょうか?
上のコードを実行した結果が以下になります。
3990xの計算機(NVMe SSD)=> 2m50s
mac mini 2018 corei7モデル(NVMe SSD) => 23m19s
3990xの方が8.2倍ほど早く終わりました。今回は何の工夫もしていませんでしたが、それなりにスケーリングされていますね。
2021 5/4 追記
3990xのようなCPUが多い計算機でも、CPUは効率的に利用されます。
この動画ではcondaの環境を作成後、27組のペアエンドfastqについてfastpで前処理し( 3スレッド)、minimap2を使ってゲノムにマッピング(10スレッド)、最後にbamの統計をとっています(1スレッド)。
2021 5/16
resumeを付けてランすると途中からやり直せる。作業ディレクトリ(デフォルトはwork)とそのサブディレクトリが残っていること。
nextflow run test.nf -resume
例えばprocess1, 2は正常に終了したが、process3の途中でジョブをkillしてしまったとする。process3のコマンドを修正し、-resumeを付けてnextflow をランすると、process1, 2のチャンネルのフローをチェックし、すぐにprocess3から再開できる。モジュラー設計で、長い計算をゼロからやり直す必要がないように工夫されている。
その2
引用
Nextflow enables reproducible computational workflows
Paolo Di Tommaso, Maria Chatzou, Evan W Floden, Pablo Prieto Barja, Emilio Palumbo, Cedric Notredame
Nat Biotechnol. 2017 Apr 11;35(4):316-319
論文では、native(Mac OSX)とdocker環境での実行結果を比較すると、予測されたコーディング遺伝子、ノンコーディングRNA、偽遺伝子のゲノム座標に小さな不一致があったことが例として示されています。
参考
Snakemakeについてばいばいバイオさんの記事を参考にさせていただきました。
関連
結果の分析
#!/usr/bin/env nextflow
/*
* test
*/
params.reads = "$baseDir/fastq/*_{1,2}.fastq.gz"
params.genome = "$baseDir/reference/assembly.fasta"
params.outdir1 = 'results/trimmed_fastq/'
params.outdir2 = 'results/bam/'
params.outdir3 = 'results/mapping_statistics/'
Channel
.fromFilePairs( params.reads )
.ifEmpty { error "Cannot find any reads matching: ${params.reads}" }
.set { read_pairs_ch }
process preprocessing {
tag "$pair_id"
publishDir params.outdir1, mode: 'copy'
input:
tuple val(pair_id), path(reads) from read_pairs_ch
output:
set pair_id, "${pair_id}_QT_1.fq.gz" into qt1_ch
set pair_id, "${pair_id}_QT_2.fq.gz" into qt2_ch
set pair_id, "${pair_id}_1_val_1_fastqc.html" into qc1_ch
set pair_id, "${pair_id}_2_val_2_fastqc.html" into qc2_ch
"""
trim_galore --paired ${pair_id}_1.fastq.gz ${pair_id}_2.fastq.gz --fastqc --length 20 -q 30
mv ${pair_id}_1_val_1.fq.gz ${pair_id}_QT_1.fq.gz
mv ${pair_id}_2_val_2.fq.gz ${pair_id}_QT_2.fq.gz
"""
}
process mapping {
tag "$pair_id"
publishDir params.outdir2, mode: 'copy'
cpus 2
input:
path genome from params.genome
tuple val(pair_id), path(reads1) from qt1_ch
tuple val(pair_id), path(reads2) from qt2_ch
output:
set pair_id, "${pair_id}.bam" into bam_ch
"""
minimap2 -ax sr -t ${task.cpus} ${genome} $reads1 $reads2 | samtools sort -O BAM -@ ${task.cpus} - > ${pair_id}.bam
"""
}
process statistics {
tag "$pair_id"
publishDir params.outdir3, mode: 'copy'
input:
tuple val(pair_id), path(bam) from bam_ch
output:
set pair_id, "${pair_id}_flagstats"
"""
samtools flagstat $bam > ${pair_id}_flagstats
"""
}