macでインフォマティクス

macでインフォマティクス

HTS (NGS) 関連のインフォマティクス情報についてまとめています。

マルチサンプルに対応したkraken2のフォーク

2023/12/20 追記、12/21 インストール手順修正


Kraken 2は、k-merの完全一致を利用したシークエンシングリードの分類学的プロファイリングツールで、メタゲノムやメタアンプリコンの分類や汚染のチエックなどに幅広く使用されている。データベースは自分で作成することもできるが(custom databaseの項を参照)、おそそらくは公開されているスタンダードデータベースがよく使われている(standard databseの項を参照)。このスタンダードデータベースはバクテリア古細菌、ウイルスドメインのRefSeqの全ゲノム、ヒトゲノム、既知のベクターのコレクションなどが含まれている(構築後のサイズは2022年8月でhash.k2dは57GBくらい)。また、より大きなGTDB互換kraken2データベースも有志の手によって公開されている(構築後のhash.k2dのサイズは308GBくらい)。kraken2の実行時は、このデータベースがRAMにロードされる。スタンダードデータベースではこのデータベースのロードにより50GB以上のメモリを必要とする(v1よりかなり抑えられている)。kraken2 GTDB-D.Bだと6倍ほど多くメモリを使う。

kraken2を大量のサンプルに対して実行する場合、このD.Bのロード時間が一番のボトルネックとなる。例えば自分の計算環境ではシーケンシャルリード6500MB/sくらいのエンタープライズ向けPCI接続SSDにスタンダードデータベースを配置してD.Bのロードを行っているが、それでもおよそ30秒かかる。それに対して、ロード後の100万リードの分類は素晴らしく高速で5秒程度で終わる。SATA接続SSDだとデータベースのロードにはより長い時間がかかり、HDDから読み出すとだといつまで経っても終わらないような感覚になる。サンプル数が増えるにつれて、データベースのロード時間が全ランタイムに対して支配的になる(1,000サンプルではD.Bロードに30,000秒(8.3-h)、分析に5,000秒(1.4-h))*1。。データベースロード時間の問題を抜本的に解決するには、複数サンプルを扱う時もデータベースのロードが1回であることが望ましい (すなわち、1,000サンプルではD.Bロードに30秒、分析に5,000秒)。しかし2022年12月現在では本家kraken2は複数サンプル指定に対応しておらず、ワイルドカードでまとめて指定してもスキップされる。

そこで、ここではマルチサンプルに対応したkraken2のフォークを試す。これを使う事で、データベースのロードは一度のみで大量のfastqの分類学的プロファイリングを行うことができる。


kraken2 D.B

https://benlangmead.github.io/aws-indexes/k2


インストール

kraken2.0.9-betaを試した。

Github

mamba create -n kraken2folk -y
conda activate kraken2folk
git clone https://github.com/daydream-boost/kraken2.git
cd kraken2/
./install_kraken2.sh <path>/<to>/pre-build_kraken_database
#メッセージを読んで、シンボリックリンクを貼る。ここでは仮想環境のbin/に
ln -s <path>/<to>/pre-build_kraken_database/kraken2* ~/mambaforge/envs/kraken2folk/bin/

>kraken2 -v


スタンダードD.B

kraken2-build --standard --db kraken2_DB --threads 24

このコマンドを実行するとカレントにkraken2_DBディレクトリが作成され、その中にゲノムやtaxonomyがダウンロードされてデータベースがビルドされる。ハードウェアと回線速度にもよるが、1日近くかかると思っておいた方がよい。


実行方法

各サンプルのシークエンシングリードを順番に指定する。フルパスでの指定には対応していないので相対パスで指定する。拡張子はfqやfastqなどに対応している。圧縮している場合、解凍してから使用する(本家kraken2はgzipped fastqに対応している)。サンプルが多いときはワイルドカードと組み合わせて指定する。

mkdir out_dir
kraken2 --paired --threads 20 -db kraken_db --confidence 0.5 --output out_dir/ cleandata/sample1_clean_R1.fq cleandata/sample1_clean_R2.fq ... cleandata/samplen_clean_R1.fq cleandata/samplen_clean_R2.fq

#ワイルドカード指定
kraken2 --paired --threads 20 -db kraken_db --confidence 0.5 --output out_dir/ fastq_dir/sample*.fastq

本家の一部のオプションは対応していない。そしてエラーメッセージは常に”ペアのリードを指定してください”と出るが、対応していないオプションを指定した時もこのメッセージが出るので注意。別のエラーである可能性がある。


目的の分類群が存在するかしないか調査のため、ゼロカウントも全て出力。

mkdir kraken2_taxonomic_profiling
kraken2 --use-names --report-zero-counts --paired --threads 20 -db <path>/<to>/kraken2-full-database/ --output kraken2_taxonomic_profiling/ --report report.txt fastq_dir/SRR*_{1,2}.fastq


kraken2_taxonomic_profiling/

カレントパスにはreport.txtが出力される。


コメント

サンプル名がSRAなどの番号だと、コマンドへのファイル名提供方法によっては奇数サンプルのファイルしか出力されなくなる。ペアエンドはあらかじめマージし、--pairedなしで指定したほうがよいかもしれない。


  • folkはv2.0.9が最新。本家kraken2のより新しいv2.1.3で作成したDBを読み込むと、ロード途中でフリーズした。(間違い)
  • より新しいversionのkrakenで作ったデータベースでも、このkraken2 folkインストール時に./install_kraken2.shコマンドで指定して作っていれば認識する。複数ファイルを認識しないなら、./install_kraken2.shで指定したデータベース内にできるkraken2が使われていないことをまず疑う。
  • 本folkより新しいversionのkraken2で作ったtranslateデータベースも認識する。
  • v2.0.9でデータベースをダウンロードしてビルドするとエラーが起きるようになった。原因はダウンロードURLが変更されているため。rsync_from_ncbi.plがダウンロードスクリプトなので、findでrsync_from_ncbi.plのパスを確認し(find ~/mambaforge/ -name rsync_from_ncbi.pl)し、v2.1.3のrsync_from_ncbi.plと置き換えてからビルドすれば回避できる。

引用

GitHub - daydream-boost/kraken2: The second version of the Kraken taxonomic sequence classification system


The second version of the Kraken taxonomic sequence classification system

https://github.com/DerrickWood/kraken2


参考

https://github.com/DerrickWood/kraken2/issues/87


*1

最新のEPYC計算機構成でRAM diskを試す事も思いつくが、いずれにせよRAM diskは共用の計算機環境では使えない

BinSPreader


 近年、ハイスループットなシーケンシングが進んでいるが、微生物集団のメタゲノム解析は依然として困難な状況にある。特に、メタゲノムで構築されたゲノム(MAG)は、種間反復、カバレッジの不均一、菌株数の変動などにより、しばしば断片化されている。MAGは、入力データの特徴を利用して、同一種に属すると推定される長いコンティグをクラスタリングするビニング処理によって構築される。このツールは、アセンブリグラフのトポロジーやその他の接続情報を利用して、ビニングを改良し、ビニングエラーを修正し、ビニングを短いコンティグに伝播させるものである。BinSPreaderは、純度を犠牲にすることなくビンの完全性を高めることができ、複数のMAGに属するコンティグを予測することができることを示す。


HP

http://cab.spbu.ru/software/binspreader/


インストール

BinSPreaderはSPAdes上に実装されており、SPAdesパッケージの一部として公開予定となっている。現在、BinSPreaderを含むSPAdesパッケージのプレリリースバージョンをダウンロードしてビルドできるようになっている。

ビルド依存

  • g++ (version 5.3.1 or higher)
  • cmake (version 3.12 or higher)
  • zlib
  • libbz2

Github;BinSPreader: early access version

https://github.com/ablab/spades/releases/tag/binspreader-recombseq

cd spades/assembler/
mkdir build && cd build && cmake ../src
make bin-refine
cd bin/

> ./bin-refine

$ ./bin-refine 

SYNOPSIS

        ./bin-refine <graph (in binary or GFA)> <file with binning from binner in .tsv format> <output path to write binning results after propagation> [--paths <contig.paths>] [--dataset <yaml>] [-l <value>] [-t <value>] [-e <eps>] [-n <value>] [-m] [-Smax|-Smle] [-Rcorr|-Rprop] [--cami] [--zero-bin] [--tall-multi] [--bin-dist] [-la <labeled alpha>] [--sparse-propagation] [--no-unbinned-bin] [-ma <--metaalpha>] [-lt <--length-threshold>] [-db <--distance-bound>] [-r] [-b <threshold>] [--bin-load] [--debug] [--tmp-dir <dir>]


OPTIONS

        --paths <contig.paths>

                    use contig paths from file


        --dataset <yaml>

                    dataset description (in YAML)


        -l <value>  library index (0-based, default: 0)

        -t <value>  # of threads to use

        -e <eps>    convergence relative tolerance threshold

        -n <value>  maximum number of iterations

        -m          allow multiple bin assignment

        -Smax|-Smle binning assignment strategy


        -Rcorr|-Rprop

                    binning refiner type


        --cami      use CAMI bioboxes binning format

        --zero-bin  emit zero bin for unbinned sequences


        --tall-multi

                    use tall table for multiple binning result


        --bin-dist  estimate pairwise bin distance (could be slow on large graphs!)


        -la <labeled alpha>

                    labels correction alpha for labeled data


        Sparse propagation options:

            --sparse-propagation

                    Gradually reduce alpha from binned to unbinned edges


            --no-unbinned-bin

                    Do not create a special bin for unbinned contigs


            -ma <--metaalpha>

                    Labels correction alpha for sparse propagation procedure


            -lt <--length-threshold>

                    Binning will not be propagated to edges longer than threshold


            -db <--distance-bound>

                    Binning will not be propagated further than bound


        Read splitting options:

            -r, --reads

                    split reads according to binning


            -b, --bin-weight <threshold>

                    reads bin weight threshold


        Developer options:

            --bin-load

                    load binary-converted reads from tmpdir


            --debug produce lots of debug data


            --tmp-dir <dir>

                    scratch directory to use


実行方法

リファインするためのbinning結果と、情報ソースとしてGFA 1.0フォーマットのアセンブリグラフを必要とする。オプションで複数のHi-Cやペアエンドライブラリを使用することもできる。

bin-refine assembly.gfa binning.tsv output_dir


引用

BinSPreader: Refine binning results for fuller MAG reconstruction

Ivan Tolstoganov, Yuri Kamenev, Roman Kruglikov, Sofia Ochkalova, Anton Korobeynikov

iScience. 2022 Jul 19;25(8):104770.


高品質の原核生物ゲノムを正確かつ一貫してアノテーション付けた proGenomes3


 ゲノム、トランスクリプトーム、その他の微生物オミックスデータの解釈は、十分にアノテーションされたゲノムの利用可能性に大きく依存している。公開されている微生物ゲノムの数が指数関数的に増加し続ける中、品質管理と一貫したアノテーションの必要性が非常に重要になってきている。このデータベースは、可動遺伝因子や生合成遺伝子クラスターを含む複数の機能的・分類学的データベースを用いて一貫したアノテーションを行った40億遺伝子を含む907 388の高品質ゲノムのデータベースである。このデータベースは http://progenomes.embl.de/ で公開されている。

(一部略)

 一般的な機能アノテーションは比較ゲノム研究において最も重要であるが(proGenomesではeggNOGアノテーションが使用されている)、一部のゲノム因子には焦点を当てた専用のアプローチが必要である。例えば、原核生物ゲノムの平均13%を占める可動遺伝因子(MGEs)のアノテーションはまだ十分ではない。多くのデータベースは特定のMGEのアノテーションに特化しており、比較解析のためにゲノム内の全てのMGEを概観することは不可能である。proGenomes3の新機能として、著者らはリコンビナーゼマーカー遺伝子を用いて代表的な全ゲノムのMGEを同定し、さらに以前に記述したモバイルエレメントアノテーションフレームワークに基づき、トランスポゾンタイプ、ファージ、ファージ様エレメント、共役エレメント、モビリティアイランド、インテグロンとしてアノテーションした。

 ゲノムの品質を確保するためには、ゲノムの完全性と汚染度を評価する必要がある。proGenomes3は、これらの品質管理ツールを、収録されたすべてのゲノムに適用し、分類学的および機能的に一貫したアノテーションを行った。これらは生息地情報と組み合わせてリンクされ、比較解析やメタゲノム研究にさらなる価値をもたらす。今回のバージョンアップでは、proGenomes2の10倍のゲノム配列とアノテーションを提供し、より高い系統的カバレッジを実現した。さらに、これらのゲノムは多くの追加リソースにリンクされており、興味のあるゲノムの全体像に直接アクセスすることができる。proGenomes3では、多くのワークフローが改良され、約100万ゲノム、40億遺伝子の処理が可能になり、アノテーショントラックの数も増えた。proGenomes3は、原核生物ゲノムの比較解析に必要なすべての機能を簡単に利用することができる。


webサービス

https://progenomes.embl.de/


NCBIアセンブリIDまたは生物、種、クレードの分類名で検索できる。


利用可能な全ゲノム情報、マーカー遺伝子、アノテーション情報、オルソログ、抗生物質耐性遺伝子などをまとめてダウンロードできる。

クリックするとダウンロードできる。右端のタブからまとめてダウンロードもできる。mobile genomic elementsは全てのゲノムで調べられているわけではないのかもしれない。自分が知っているたくさんのISを持つ細菌ゲノムのいくつかで、mobile genomic elementsがゼロと表示された(要確認)。


SpecIクラスターではhabitat情報を確認できる(単離ゲノムのサンプリング地域)。

Microbe Atlas Project (MAP)にもリンクしている。


画像上のTaxonomyからtaxaを繰り替えできる。例えばVibrioをクリックすればVibrio属で利用可能な種一覧が表示される。また、全てのcontigやアノテーションをまとめてダウンロードできる(contigは利用できるゲノムの全部の配列が1つのファイルにまとめられている点に注意)


  • 更新は定期的に行われ、基盤となる計算パイプラインは2年ごとにメジャーバージョンアップが予定されている。現在のリリース;proGenomes 3.0は、2021年9月30日にゲノムがダウンロードされた。


以前proGenomes2を紹介しているので、proGenomes3は簡単に紹介しました。興味がある方はアクセスしてみてください。

引用

proGenomes3: approaching one million accurately and consistently annotated high-quality prokaryotic genomes 
Anthony Fullam,  Ivica Letunic,  Thomas S B Schmidt,  Quinten R Ducarmon, Nicolai Karcher,  Supriya Khedkar,  Michael Kuhn,  Martin Larralde, Oleksandr M Maistrenko,  Lukas Malfertheiner,  Alessio Milanese, Joao Frederico Matias Rodrigues,  Claudia Sanchis-López,  Christian Schudoma, Damian Szklarczyk,  Shinichi Sunagawa,  Georg Zeller,  Jaime Huerta-Cepas, Christian von Mering,  Peer Bork,  Daniel R Mende
Nucleic Acids Research, Published: 21 November 2022


関連


メタゲノム情報も利用するメタトランスクリプトームアセンブラ MetaGT


 メタゲノムシーケンスは、微生物コミュニティのゲノム配列と構成に関する洞察を提供することができるが、メタトランスクリプトーム解析は、微生物コミュニティの機能的活性を研究するために有用であると考えられる。RNA-Seqデータは、コミュニティ内の活性な遺伝子と、その発現レベルが外部条件にどのように依存するかを決定する可能性を提供する。メタトランスクリプトミクスの分野は比較的新しいが、メタトランスクリプトーム解析に関連するプロジェクトは年々増加し、その応用範囲も広がっている。しかし、メタトランススクリプトーム解析を複雑にしているいくつかの問題がある。微生物コミュニティの複雑さ、トランスクリプトーム発現の広いダイナミックレンジ、そして重要なことは、メタRNAシーケンスデータを組み立てるための高品質の計算機手法がないことである。これらの要因は、メタトランスクリプトームアセンブリの連続性と完全性を悪化させ、その結果、さらなるダウンストリーム解析に影響を及ぼす。本発表では、メタトランスクリプトームのde novoアセンブリのためのパイプラインであるMetaGTを紹介する。これは、同じサンプルからシーケンスされたメタトランスクリプトームとメタゲノム両方のデータを組み合わせるというアイデアに基づいている。MetaGTはメタトランスクリプトームコンティグをアセンブルし、メタゲノムとのアラインメントに基づいて欠損領域を埋める。このアプローチにより、複雑な構造を克服し、完全なRNA配列を得ることができ、さらにその存在量も推定することができる。MetaGTは、メタゲノム情報を利用しない既存の手法と比較して、メタトランススクリプトームアセンブリカバレッジと完全性が大幅に向上することを、一般に公開されている様々な実データやシミュレーションデータを用いて実証している。このパイプラインはNextFlowで実装されており、https://github.com/ablab/metaGT から自由に利用することができる。


インストール

依存

  • Nextflowの20.04以上

Github

#test run
nextflow run metaGT -profile test,conda


#ここではレポジトリをcloneする
git clone https://github.com/ablab/metaGT.git
cd metaGT/
#依存するツールをmambaでインストール(打たなくてもラン開始時に自動導入されるが、condaだと時間がかかる)
mamba env create --file environment.yml
nextflow run main.nf -profile test,conda

#環境構築に失敗したので、以前作ったprokkaの仮想環境をアクティブにして、prokka以外の依存するツールとライブラリを追加導入した。
conda activate my_prokka_env
mamba install -c conda-forge -c bioconda -c defaults pysam mmseqs2 kallisto samtools transdecoder yaml minimap2


実行方法

cd metaGT/
nextflow run main.nf -profile test

エラーが起きる。logを見る限りindexingのステップで失敗している。


引用

MetaGT: A pipeline for de novo assembly of metatranscriptomes with the aid of metagenomic data
Daria Shafranskaya 1, Varsha Kale 2, Rob Finn 2, Alla L Lapidus 1, Anton Korobeynikov 1, Andrey D Prjibelski

Front Microbiol. 2022 Oct 28;13:981458

MinHashスケッチで数百万個のバクテリアゲノムの高速クラスタリング解析を可能にする RabbitTClust


 スケッチベースの距離推定に基づく、高速でメモリ効率の良いゲノムクラスターツールRabbitTClustを紹介する。本手法は、次元削減技術とストリーミング、最新のマルチコアプラットフォーム上での並列化を組み合わせることで、大規模データセットの効率的な処理を可能にする。113,674の完全長細菌ゲノム配列(RefSeq: 455 GB in FASTA format)を6分以内に、1,009,738のGenBankアセンブル細菌ゲノム(FASTA format 4.0 TB)を128コアのワークステーションでわずか34分以内にクラスタリングすることができる。さらに、RefSeq細菌ゲノムに含まれる1,269個の冗長なゲノム(ヌクレオチド内容が同一)を同定することに成功した。


インストール

ビルド依存

  • cmake v.3.0 or later
  • c++14
  • zlib

GIthub

git clone --recursive https://github.com/RabbitBio/RabbitTClust.git
cd RabbitTClust
./install.sh

> ./clust-mst 

usage: clust-mst [-h] [-l] [-t] <int> [-d] <double> -F <string> [-i] <string> [-o] <string> 

usage: clust-mst [-h] [-f] [-E] [-d] <double> [-i] <string> <string> [-o] <string>

usage: clust-greedy [-h] [-l] [-t] <int> [-d] <double> [-F] <string> [-i] <string> [-o] <string> 

usage: clust-greedy [-h] [-f] [-d] <double> [-i] <string> <string> [-o] <string>

    -h        : this help message

    -m <int>    : set the filter minimum genome length (minLen), genome with total length less the minLen will be ignore, for both clust-mst and clust-greedy

    -k <int>    : set kmer size, automatically calculate the kmer size without -k option, for both clust-mst and clust-greedy

    -s <int>    : set sketch size, default 1000, for both clust-mst and clust-greedy

    -c <int>    : set sampling ratio to compute viriable sketchSize, sketchSize = genomeSize/samplingRatio, only support with MinHash sketch function of clust-greedy

    -d <double>    : set the distance threshold, default 0.05 for both clust-mst and clust-greedy

    -t <int>    : set the thread number, default take full usage of platform cores number, for both clust-mst and clust-greedy

    -l        : input is a file list, not a single gneome file. Lines in the input file list specify paths to genome files, one per line, for both clust-mst and clust greedy

    -i <string>    : path of original input genome file or file list, input as the intermediate files should be used with option -f or -E 

    -f        : two input files, genomeInfo and MSTInfo files for clust-mst; genomeInfo and sketchInfo files for clust-greedy

    -E        : two input files, genomeInfo and sketchInfo for clust-mst

    -o <string>    : path of output file, for both clust-mst and clust-greedy

    -F <string>    : set the sketch function, including MinHash and KSSD, default MinHash, for both clust-mst and clust-greedy

    -e        : not save the intermediate files generated from the origin genome file, such as the GenomeInfo, MSTInfo, and SketchInfo files, for both clust-mst and clust-greedy


> ./clust-greedy

usage: clust-mst [-h] [-l] [-t] <int> [-d] <double> -F <string> [-i]

<string> [-o] <string>

usage: clust-mst [-h] [-f] [-E] [-d] <double> [-i] <string> <string>

[-o] <string>

usage: clust-greedy [-h] [-l] [-t] <int> [-d] <double> [-F] <string>

[-i] <string> [-o] <string>

usage: clust-greedy [-h] [-f] [-d] <double> [-i] <string> <string> [-o] <string>

-h : this help message

-m <int> : set the filter minimum genome length (minLen), genome with

total length less the minLen will be ignore, for both clust-mst and

clust-greedy

-k <int> : set kmer size, automatically calculate the kmer size

without -k option, for both clust-mst and clust-greedy

-s <int> : set sketch size, default 1000, for both clust-mst and clust-greedy

-c <int> : set sampling ratio to compute viriable sketchSize,

sketchSize = genomeSize/samplingRatio, only support with MinHash

sketch function of clust-greedy

-d <double> : set the distance threshold, default 0.05 for both

clust-mst and clust-greedy

-t <int> : set the thread number, default take full usage of platform

cores number, for both clust-mst and clust-greedy

-l : input is a file list, not a single gneome file. Lines in the

input file list specify paths to genome files, one per line, for both

clust-mst and clust greedy

-i <string> : path of original input genome file or file list, input

as the intermediate files should be used with option -f or -E

-f : two input files, genomeInfo and MSTInfo files for clust-mst;

genomeInfo and sketchInfo files for clust-greedy

-E : two input files, genomeInfo and sketchInfo for clust-mst

-o <string> : path of output file, for both clust-mst and clust-greedy

-F <string> : set the sketch function, including MinHash and KSSD,

default MinHash, for both clust-mst and clust-greedy

-e : not save the intermediate files generated from the origin genome

file, such as the GenomeInfo, MSTInfo, and SketchInfo files, for both

clust-mst and clust-greedy


実行方法

RabbitTClustは、古典的なシングルリンク階層型(clust-mst)と貪欲なインクリメンタルクラスタリング(clust-greedy)のアルゴリズムをサポートし、様々なシナリオに対応する。


単一のゲノム配列を指定(1つのファイル内に含まれる複数の配列間の比較)。

clust-mst -i bacteria.fna -o bacteria.mst.clust

clust-greedy -l -i bact_genbank.list -o bact_genbank.greedy.clust

bacteria.mst.clustが出力される。


複数のゲノム配列を指定する場合はゲノムファイルのパスを記載したリストを提供する。"-l"を指定する。

ls <path>/<to>/genome*.fna
clust-mst -l -i bact_refseq.list -o bact_refseq.mst.clust

clust-greedy -l -i bact_genbank.list -o bact_genbank.greedy.clust
  •  -l     nput is a file list, not a single gneome file. Lines in the input file list specify paths to genome files, one per line, for both clust-mst and clust greedy


複数ゲノムを指定した場合、 出力はCD-HIT ライクなタブ区切り形式となっている。

クラスタに含まれるゲノムが報告される。cluster0には6つのゲノムが含まれる。左端の列から
1、クラスタ内のローカルインデックス
2,ゲノムのグローバルインデックス
3,ゲノムサイズ
4,ゲノムファイル名 (ゲノムアセンブリのアクセッション番号を含む)
5,配列名 (ゲノムファイル中の最初の配列)
6,配列コメント(行の残り部分)

およそ4000個の細菌ゲノムをclust-mstで分析したところ、ランタイムは数秒だった。


コメント

研究とは関係ありませんが、レポジトリのウサギのイラスト可愛いですね。

引用

RabbitTClust: enabling fast clustering analysis of millions bacteria genomes with MinHash sketches

Xiaoming Xu,  Zekun Yin,  Lifeng Yan,  Hao Zhang, Borui Xu, Yanjie Wei, Beifang Niu, Bertil Schmidt, Weiguo Liu

bioRxiv, Posted November 10, 2022.


引用

RabbitTClust: enabling fast clustering analysis of millions of bacteria genomes with MinHash sketches
Xiaoming Xu, Zekun Yin, Lifeng Yan, Hao Zhang, Borui Xu, Yanjie Wei, Beifang Niu, Bertil Schmidt & Weiguo Liu 
Genome Biology volume 24, Article number: 121 (2023) 


スプライシングバリエーションを視覚化する sashimi.py


 クロマチンの発現、タンパク質-DNA/RNA相互作用、アクセス性、構造などが条件や細胞種によってどのように異なるかを同時に可視化することにより、オルタナティブスプライシングの制御機構や機能的影響について理解を深めることができる。しかし、既存のSashimiプロット作成ツールは、柔軟性に欠け、複雑で、複数のバイオインフォマティクスフォーマットや様々なゲノミクスアッセイからのデータソースを統合するには使い勝手が悪いままである。そのため、より拡張性のある可視化ツールが必要とされている。ここでは、プログラマブルインタラクティブなWebベースのアプローチにより、出版品質の可視化を生成するPythonパッケージであるsashimi.pyを紹介する。Sashimi.pyは、シングルセルRNA-seq、タンパク質-DNA/RNA相互作用、ロングリードシーケンスデータ、Hi-Cデータなどの多種多様なデータソースのゲノムデータを前処理なしで視覚的に解釈するプラットフォームで、主要ジャーナルの要求を満たす出力ファイルのフォーマットにも幅広い柔軟性を備えている。Sashimi.pyパッケージは、Bioconda (https://anaconda.org/bioconda/sashimi-py), Docker, PyPI (https://pypi.org/project/sashimi.py/), GitHub (https://github.com/ygidtu/sashimi.py) で自由に利用できるオープンソースソフトウェアであり、ローカル展開用の組み込みWebサーバーも提供されている。


Features of sashimi.py(Githubより)

  • Support various file formats as input
  • Support strand-aware coverage plot
  • Visualize coverage by heatmap, including HiC diagram
  • Visualize protein domain based the given gene id
  • Demultiplex the single-cell RNA/ATAC-seq which used cell barcode into cell population
  • Support visualizing individual full-length reads in read-by-read style
  • Support visualize circRNA sequencing data


インストール

mambaでpython3.10の環境を作ってテストした(ubuntu18使用)。

Github

#conda(bioconda)
mmaba create -n sashimi
conda activate sashimi
mamba install -c conda-froge -c bioconda sashimi-py -y

#pip(pypi)
pip install sashimi.py

#docker(dockerhub)
docker pull ygidtu/sashimi
docker run --rm ygidtu/sashimi --help

#installing local web server
git clone https://github.com/ygidtu/sashimi.py sashimi
cd sashimi/web
# build the frontend static files
npm install -g vue-cli vite && npm install
vite build

# prepare the backend server
pip install fastapi pydantic jinja2 uvicorn
python server.py --help

> sashimipy -h

Usage: sashimipy [OPTIONS]

Try 'sashimipy -h' for help.


Error: Missing option '-e' / '--event'.

(sasami) kazu@kazu:~$ sashimipy -h

Usage: sashimipy [OPTIONS]


  Welcome to use sashimi


Options:

  --version                       Show the version and exit.

  --debug                         enable debug level log

  -e, --event TEXT                Event range eg: chr1:100-200:+  [required]

  Common input files configuration:

    --color-factor INTEGER RANGE  Index of column with color levels (1-based);

                                  NOTE: LUAD|red -> LUAD while be labeled in

                                  plots and red while be the fill color

                                  [default: 1; x>=1]

    --barcode PATH                Path to barcode list file, At list two

                                  columns were required, - 1st The name of bam

                                  file;- 2nd the barcode;- 3rd The group

                                  label, optional;- 4th The color of each

                                  cell type, default using the color of

                                  corresponding bam file.

    --barcode-tag TEXT            The default cell barcode tag label

                                  [default: CB]

    --umi-tag TEXT                The default UMI barcode tag label  [default:

                                  UB]

    -p, --process INTEGER RANGE   How many cpu to use  [1<=x<=128]

    --group-by-cell               Group by cell types in density/line plot

    --remove-duplicate-umi        Drop duplicated UMIs by barcode

  Output settings:

    -o, --output PATH             Path to output graph file

    -d, --dpi INTEGER RANGE       The resolution of output file  [default:

                                  300; x>=1]

    --raster                      The would convert heatmap and site plot to

                                  raster image (speed up rendering and produce

                                  smaller files), only affects pdf, svg and PS

    --height FLOAT                The height of output file, default adjust

                                  image height by content  [default: 1]

    --width INTEGER RANGE         The width of output file, default adjust

                                  image width by content  [default: 10; x>=0]

    --backend TEXT                Recommended backend  [default: Agg]

  Reference settings:

    -r, --reference PATH          Path to gtf file, both transcript and exon

                                  tags are necessary

    --interval PATH               Path to list of interval files in bed

                                  format, 1st column is path to file, 2nd

                                  column is the label [optional]

    --show-id                     Whether show gene id or gene name

    --show-exon-id                Whether show gene id or gene name

    --no-gene                     Do not show gene id next to transcript id

    --domain                      Add domain information into reference track

    --proxy TEXT                  The http or https proxy for EBI/Uniprot

                                  requests,if `--domain` is True, eg:

                                  http://127.0.0.1:1080

    --timeout INTEGER RANGE       The requests timeout when `--domain` is

                                  True.  [default: 10; x>=1]

    --local-domain TEXT           Load local domain folder and load into

                                  reference track, download from https://hgdow

                                  nload.soe.ucsc.edu/gbdb/hg38/uniprot/

    --remove-empty                Whether to plot empty transcript

    --transcripts-to-show TEXT    Which transcript to show, transcript name or

                                  id in gtf file, eg: transcript1,transcript2

    --choose-primary              Whether choose primary transcript to plot.

    --ref-color TEXT              The color of exons  [default: black]

    --intron-scale FLOAT          The scale of intron  [default: 0.5]

    --exon-scale FLOAT            The scale of exon  [default: 1]

  Density plot settings:

    --density PATH                The path to list of input files, a tab

                                  separated text file,  - 1st column is path

                                  to input file, - 2nd column is the file

                                  category, - 3rd column is input file alias

                                  (optional), - 4th column is color of input

                                  files (optional), - 5th column is the

                                  library of input file (optional, only

                                  required by bam file).

    --customized-junction TEXT    Path to junction table column name needs to

                                  be bam name or bam alias.

    --only-customized-junction    Only used customized junctions.

    -t, --threshold INTEGER RANGE

                                  Threshold to filter low abundance junctions

                                  [default: 0; x>=0]

    --density-by-strand           Whether to draw density plot by strand

    --show-site                   Whether to draw additional site plot

    --site-strand [all|+|-]       Which strand kept for site plot, default use

                                  all  [default: all]

    --included-junctions TEXT     The junction id for including, chr1:1-100

    --show-junction-num           Whether to show the number of junctions

    --sc-density-height-ratio FLOAT

                                  The relative height of single cell density

                                  plots  [default: 1]

  Line plot settings:

    --line PATH                   The path to list of input files, a tab

                                  separated text file,  - 1st column is path

                                  to input file, - 2nd column is the file

                                  category, - 3rd column is input file group

                                  (optional), - 4th column is input file

                                  alias (optional),  - 5th column is color

                                  platte of corresponding group (optional).

    --hide-legend                 Whether to hide legend

    --legend-position TEXT        The legend position

    --legend-ncol INTEGER RANGE   The number of columns of legend  [x>=0]

  Heatmap plot settings:

    --heatmap PATH                The path to list of input files, a tab

                                  separated text file,  - 1st column is path

                                  to input file, - 2nd column is the file

                                  category, - 3rd column is input file group

                                  (optional), - 4th column is color platte

                                  of corresponding group.

    --clustering                  Enable clustering of the heatmap

    --clustering-method [single|complete|average|weighted|centroid|median|ward]

                                  The clustering method for heatmap  [default:

                                  ward]

    --distance-metric

[braycurtis|canberra|chebyshev|cityblock|correlation|cosine|dice|euclidean|hamming|jaccard|jensenshannon|kulsinski|kulczynski1|mahalanobis|matching|minkowski|rogerstanimoto|russellrao|seuclidean|sokalmichener|sokalsneath|sqeuclidean|yule]

                                  The distance metric for heatmap  [default:

                                  euclidean]

    --heatmap-scale               Do scale on heatmap matrix.

    --heatmap-vmin INTEGER        Minimum value to anchor the colormap,

                                  otherwise they are inferred from the data.

    --heatmap-vmax INTEGER        Maximum value to anchor the colormap,

                                  otherwise they are inferred from the data.

    --show-row-names              Show row names of heatmap

    --sc-heatmap-height-ratio FLOAT

                                  The relative height of single cell heatmap

                                  plots  [default: 0.2]

  IGV settings:

    --igv PATH                    The path to list of input files, a tab

                                  separated text file,  - 1st column is path

                                  to input file, - 2nd column is the file

                                  category, - 3rd column is input file alias

                                  (optional), - 4th column is color of input

                                  files (optional) - 5th column is exon_id

                                  for sorting the reads (optional).

    --m6a TEXT                    Sashimi.py will load location information

                                  from the given tags and  then highlight

                                  the RNA m6a modification cite at individual

                                  reads.  If there are multiple m6a

                                  modification site, please add tag as follow,

                                   234423,234450

    --polya TEXT                  Sashimi.py will load length of poly(A) from

                                  the given tags and  then visualize the

                                  poly(A) part at end of each individual

                                  reads.

    --rs TEXT                     Sashimi.py will load real strand information

                                  of each reads from the given tags and  the

                                  strand information is necessary for

                                  visualizing poly(A) part.

    --del-ratio-ignore FLOAT RANGE

                                  Ignore the deletion gap in nanopore or

                                  pacbio reads. if a deletion region was

                                  smaller than (alignment length) *

                                  (del_ratio_ignore), then the deletion gap

                                  will be filled. currently the

                                  del_ratio_ignore was 1.0.  [0.0<=x<=1.0]

  HiC settings:

    --hic PATH                    The path to list of input files, a tab

                                  separated text file,  - 1st column is path

                                  to input file, - 2nd column is the file

                                  category, - 3rd column is input file alias

                                  (optional), - 4th column is color of input

                                  files (optional) - 5th column is data

                                  transform for HiC matrix, eg log1p, log2,

                                  log10 (optional).

  Additional annotation:

    -f, --genome PATH             Path to genome fasta

    --sites TEXT                  Where to plot additional indicator lines,

                                  comma separated int

    --stroke TEXT                 The stroke regions:

                                  start1-end1:start2-end2@color-label, draw a

                                  stroke line at bottom, default color is red

    --link TEXT                   The link: start1-end1:start2-end2@color,

                                  draw a link between two site at bottom,

                                  default color is blue

    --focus TEXT                  The highlight regions: 100-200:300-400

  Motif settings:

    --motif PATH                  The path to customized bedGraph file, first

                                  three columns is chrom, start and end site,

                                  the following 4 columns is the weight of

                                  ATCG.

    --motif-region TEXT           The region of motif to plot in start-end

                                  format

    --motif-width FLOAT           The width of ATCG characters  [default: 0.8]

  Layout settings:

    --n-y-ticks INTEGER RANGE     The number of ticks of y-axis  [x>=0]

    --distance-ratio FLOAT        distance between transcript label and

                                  transcript line  [default: 0.1]

    --reference-scale FLOAT       The size of reference plot in final plot

                                  [default: 0.25]

    --stroke-scale FLOAT          The size of stroke plot in final image

                                  [default: 0.25]

  Overall settings:

    --font-size INTEGER RANGE     The font size of x, y-axis and so on  [x>=1]

    --reverse-minus               Whether to reverse strand of bam/reference

                                  file

    --hide-y-label                Whether hide y-axis label

    --same-y                      Whether different sashimi/line plots shared

                                  same y-axis boundaries

    --log [0|2|10|zscore]         y axis log transformed, 0 -> not log

                                  transform; 2 -> log2; 10 -> log10

    --title TEXT                  Title

    --font TEXT                   Fonts

  -h, --help                      Show this message and exit.


テストラン

sashimipyはBAM、Bed、bigBed、bigWig、Depth file generated by samtools depth
、naive Hi-C formatをサポートしている。Githubでは利用可能な大半のオプションをつけてランした例が掲載されている。

git clone https://github.com/ygidtu/sashimi.py sashimi
cd sashimi/
python main.py \
  -e chr1:1270656-1284730:+ \
  -r example/example.sorted.gtf.gz \
  --interval example/interval_list.tsv \
  --density example/density_list.tsv \
  --show-site \
  --igv example/igv.tsv \
  --heatmap example/heatmap_list.tsv \
  --focus 1272656-1272656:1275656-1277656 \
  --stroke 1275656-1277656:1277856-1278656@blue \
  --sites 1271656,1271656,1272656 \
  --line example/line_list.tsv \
  -o example/example.png \
  --dpi 300 \
  --width 10 \
  --height 1 \
  --barcode example/barcode_list.tsv \
  --domain --remove-duplicate-umi


出力

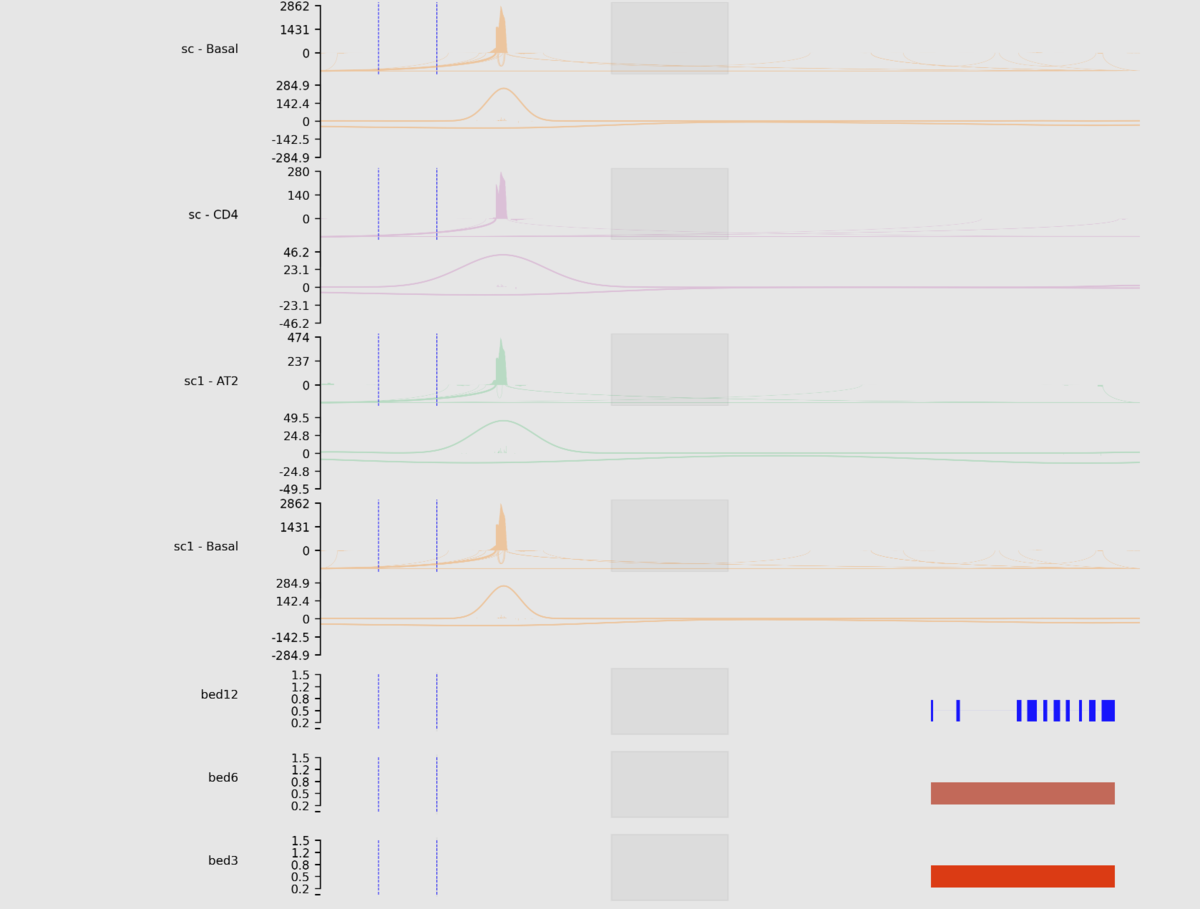
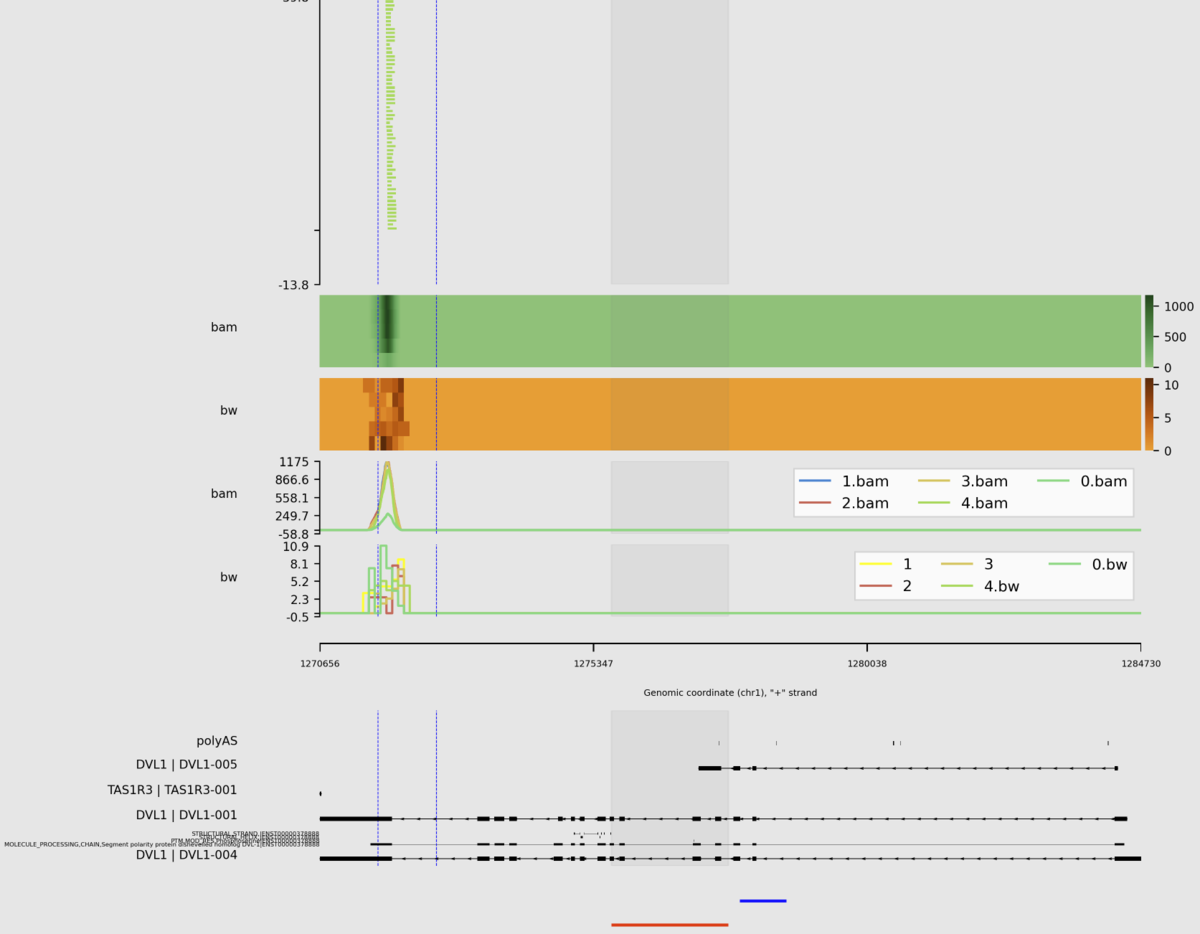
(縦長の画像なので分割して載せています)

引用

Sashimi.py: a flexible toolkit for combinatorial analysis of genomic data

Yiming Zhang,  View ORCID ProfileRan Zhou, Yuan Wang

Posted November 03, 2022


参考

What is sashimi_plot?

https://miso.readthedocs.io/en/fastmiso/sashimi.html


ファイルを安全にリネームする brenameコマンド

2023/04/13 ツイート追加


brenameはWindowsMac OS XLinuxをサポートする正規表現に対応したファイルのリネームツール。再帰的に複数の階層のファイルとディレクトリ(フォルダ)を同時にリネームしたり、一連のファイルを整数の通し番号にリネームすることもできる。安全にリネームを実行するために、上書き防止の警告やドライラン機能、実行内容の取り消し機能などを備えている。人気のツールとなっており、2015年にv1.0が公開後、2022年11月現在では200近いstarがついている。


特徴。Gihtubより

  • Cross-platform. Supporting Windows, Mac OS X and Linux.
  • Safe. By checking potential conflicts and errors.
  • Supporting Undo the LAST successful operation.
  • Overwrite can be detected and users can choose whether overwrite or leave it.
  • File filtering. Supporting including and excluding files via regular expression. No
  • need to run commands like find ./ -name "*.html" -exec CMD.
  • Renaming submatch with corresponding value via key-value file.
  • Renaming via ascending integer.
  • Recursively renaming both files and directories.
  • Supporting dry run.
  • Colorful output. Screenshots:


インストール

arm向け実行形式ファイルをダウンロードしてテストした。go getや他のパッケージマネージャでのインストールもサポートされている。

Github

go get -u github.com/shenwei356/brename/

> brename -h

$ brename -h


brename -- a practical cross-platform command-line tool for safely batch renaming files/directories via regular expression


Version: 2.11.1


Author: Wei Shen <shenwei356@gmail.com>


Homepage: https://github.com/shenwei356/brename


Attention:

  1. Paths starting with "." are ignored.

  2. Flag -f/--include-filters and -F/--exclude-filters support multiple values,

     e.g., -f ".html" -f ".htm".

     But ATTENTION: comma in filter is treated as separator of multiple filters.


Special replacement symbols:


  {nr}    Ascending integer

  {kv}    Corresponding value of the key (captured variable $n) by key-value file,

          n can be specified by flag -I/--key-capt-idx (default: 1)


Usage:

  brename [flags] [path ...] 


Examples:

  1. dry run and showing potential dangerous operations

      brename -p "abc" -d

  2. dry run and only show operations that will cause error

      brename -p "abc" -d -v 2

  3. only renaming specific paths via include filters

      brename -p ":" -r "-" -f ".htm$" -f ".html$"

  4. renaming all .jpeg files to .jpg in all subdirectories

      brename -p "\.jpeg" -r ".jpg" -R   dir

  5. using capture variables, e.g., $1, $2 ...

      brename -p "(a)" -r "\$1\$1"

      or brename -p "(a)" -r '$1$1' in Linux/Mac OS X

  6. renaming directory too

      brename -p ":" -r "-" -R -D   pdf-dirs

  7. using key-value file

      brename -p "(.+)" -r "{kv}" -k kv.tsv

  8. do not touch file extension

      brename -p ".+" -r "{nr}" -f .mkv -f .mp4 -e

  9. only list paths that match pattern (-l)

      brename -i -f '.docx?$' -p . -R -l

  10. undo the LAST successful operation

      brename -u


  More examples: https://github.com/shenwei356/brename


Flags:

  -d, --dry-run                   print rename operations but do not run

  -F, --exclude-filters strings   exclude file filter(s) (regular expression, NOT wildcard). multiple values supported, e.g., -F ".html" -F ".htm", but ATTENTION: comma in filter is treated as separator of multiple filters

  -U, --force-undo                continue undo even when some operations failed

  -h, --help                      help for brename

  -i, --ignore-case               ignore case of -p/--pattern, -f/--include-filters and -F/--exclude-filters

  -e, --ignore-ext                ignore file extension. i.e., replacement does not change file extension

  -f, --include-filters strings   include file filter(s) (regular expression, NOT wildcard). multiple values supported, e.g., -f ".html" -f ".htm", but ATTENTION: comma in filter is treated as separator of multiple filters (default [.])

  -D, --including-dir             rename directories

  -K, --keep-key                  keep the key as value when no value found for the key

  -I, --key-capt-idx int          capture variable index of key (1-based) (default 1)

  -m, --key-miss-repl string      replacement for key with no corresponding value

  -k, --kv-file string            tab-delimited key-value file for replacing key with value when using "{kv}" in -r (--replacement)

  -l, --list                      only list paths that match pattern

  -a, --list-abs                  list absolute path, using along with -l/--list

  -s, --list-sep string           separator for list of found paths (default "\n")

      --max-depth int             maximum depth for recursive search (0 for no limit)

  -N, --nature-sort               list paths in nature sort, using along with -l/--list

      --nr-width int              minimum width for {nr} in flag -r/--replacement. e.g., formating "1" to "001" by --nr-width 3 (default 1)

      --only-dir                  only rename directories

  -o, --overwrite-mode int        overwrite mode (0 for reporting error, 1 for overwrite, 2 for not renaming) (default 0)

  -p, --pattern string            search pattern (regular expression)

  -q, --quiet                     be quiet, do not show information and warning

  -R, --recursive                 rename recursively

  -r, --replacement string        replacement. capture variables supported.  e.g. $1 represents the first submatch. ATTENTION: for *nix OS, use SINGLE quote NOT double quotes or use the \ escape character. Ascending integer is also supported by "{nr}"

  -n, --start-num int             starting number when using {nr} in replacement (default 1)

  -u, --undo                      undo the LAST successful operation

  -v, --verbose int               verbose level (0 for all, 1 for warning and error, 2 for only error) (default 0)

  -V, --version                   print version information and check for update


実行方法

動作確認のためのテストデータ生成スクリプト; generate-example-folder.shが用意されている(touchコマンドで空のファイルを作り、treeコマンド(apt install tree)でディレクトリ構造を表示するスクリプト)。

git clone https://github.com/shenwei356/brename.git
cd brename/
sh generate-example-folder.sh


このテストデータディレクトリに対して、".jpeg"拡張子のファイルを".jpg"拡張子に変更するという処理を行う。brenameでは-pオプションで検索パターンを指定する。.jpegを探したいので"\.jpeg"とする(特殊文字ピリオド"."はバックスラッシュでエスケープする)。-rで置換後のパターンを指定する。-Rをつけてサブディレクトリまで対象とする(つけないとカレントディレクトリのファイルのみ対象)。最初は-dをつけてdryランして想定した通りのリネーム処理が行われるのかどうかを確認する。

#-dを付けるとドラインラン
brename -p "\.jpeg" -r ".jpg" -R -d
  • -d, --dry-run    print rename operations but do not run
  • -R, --recursive    rename recursively
  • -r, --replacement <string>     replacement. capture variables supported.  e.g. $1 represents the first submatch. ATTENTION: for *nix OS, use SINGLE quote NOT double quotes or use the \ escape character. Ascending integer is also supported by "{nr}"
  • -p, --pattern <string>     search pattern (regular expression)

ドライランでは標準出力に結果がプレビューされるが実際にはリネーム処理は実行されていない。


問題なければ-dを外して実行する。

brename -p "\.jpeg" -r ".jpg" -R

>  tree example/


-uだけつけてbrenameを実行すると、直前のリネーム処理をundo(リネーム前に戻る)できる。

brename -u
  • -u, --undo    undo the LAST successful operation


次はexampleファイルの”a"を"b"に変えるリネーム処理を考える。ディレクトリも対象にするには-Dをつける。verboseレベルを設定する-v2をつけるとエラーのみ標準出力される。まずドライランする。

brename -p a -r b -R -D -v 0 -d
  • -D, --including-dir    rename directories
  • -v, --verbose <int>   verbose level (0 for all, 1 for warning and error, 2 for only error) (default 0)

[INFO] main options:

[INFO]   ignore case: false

[INFO]   search pattern: a

[INFO]   include filters: .

[INFO]   search paths: ./

[INFO] 

[INFO] checking: [ ok ] 'a.html' -> 'b.html'

[ERRO] checking: [ new path existed ] 'a.jpeg' -> 'b.jpeg'

[ERRO] 1 potential error(s) detected, please check

a.jpegをb.jpegにリネームするリムームでエラーが検出された。理由は既にこのパスにb.jpegが存在し、元のb.jpegが消えることになるため。このように、breseqではエラーが検出された時、リネーム処理は全てのファイルにおいて実行されない。この機能により、意図しないファイルの損失や置換を防いでくれる。


大文字小文字の区別をせずにパターンマッチさせるなら"-i"をつける。

brename -p "\.jpeg" -r ".jpg" -R -i
  • -i, --ignore-case    ignore case of -p/--pattern, -f/--include-filters and -F/--exclude-filters


拡張子は対象外にするなら-eをつける。

brename -p '(.)' -r '$1 ' -d -e
  • -e, --ignore-ext     ignore file extension. i.e., replacement does not change file extension


変数をキャプチャして利用することで、より高度なリネームを行う。変数にキャプチャするにはパターンマッチさせる文字を()で囲む。

"abのパターンマッチをaaに変える。aは$1、bは$2に収納されるので$1$1ならabはaaに変わる。
brename -p "(a)(b)" -r "\$1\$1" -i -d

#任意の一文字にマッチさせるなら"."を使う。
"abとそれに続く一文字が".JPEG"の前にあるファイルをbb.jpgに変える。aは$1、bは$2、任意の一文字は$3に収納されるので、$2$2ならabはbbに変わる。
brename -p "(a)(b)(.).JPEG" -r "\$2\$2.jpg" -i -d


"-f"で追加のパターンマッチフィルターを設定することで、マッチするファイルを限定できる。正規表現に対応している。"-F"ではマッチするファイル以外が対象になる。正規表現に対応しているが、危険なワイルドカードには対応していない。

#任意の一文字の後にスペースを入れる。ただし、リネーム対象は末尾($)が.jpgのファイルに限定する。
brename -p '(.)' -r '$1 ' -f '\.jpg$' -d
  • -f, --include-filters <strings>    include file filter(s) (regular expression, NOT wildcard). multiple values supported, e.g., -f ".html" -f ".htm", but ATTENTION: comma in filter is treated as separator of multiple filters (default [.])
  • -F, --exclude-filters s<trings>    exclude file filter(s) (regular expression, NOT wildcard). multiple values supported, e.g., -F ".html" -F ".htm", but ATTENTION: comma in filter is treated as separator of multiple filters


カレントディレクトリにある.jpgで終わる全てのファイルをprefixがpic-で始まる通し番号に変換する。番号の間隔やフォーマットは"--nr-width"で変えることができる。初期値は"--start-num"で変えることができる。

brename -p '(.+)\.' -r 'pic-{nr}.' -f ".jpg$" -d
  • --nr-width <int>     minimum width for {nr} in flag -r/--replacement. e.g., formating "1" to "001" by --nr-width 3 (default 1)
  • -n, --start-num <int>     starting number when using {nr} in replacement (default 1)


パターンマッチを利用して自動でサブディレクトリに振り分ける機能も用意されている(自動でディレクトリが作られる)。下では、ハイフン(-)でカテゴリが分けられた一連のファイルを-を区切りとして分割する。例えばa-b-c.txtというファイルが存在すれば、a/b/の中にc.txtにリネームして配置される。

brename -f .txt -p '-' -r '/' -d


他にもいくつかの機能が用意されています。レポジトリを確認してください。


2022/11/29

refseqのfastaファイルおよそ40万個をリネームする処理を実行したところ、数十秒で終わりました。

引用

https://github.com/shenwei356/brename