macでインフォマティクス

macでインフォマティクス

HTS (NGS) 関連のインフォマティクス情報についてまとめています。

オルソログを探す OrthoFinder

2019/11/3 condaインストール追記

2019/11/24 help追記

2022/1/5 helpのバージョン更新

2023/03/01 docker 追記


 配列間の相同性関係を同定することは生物学的研究にとって基本である。 ここで本著者らはオルソロググループ推論アルゴリズムにおける以前には検出されていない遺伝子長バイアスを解決するOrthoFinderと呼ばれる新規なアルゴリズムを提供する。この結果、精度が著しく改善される。 実際のベンチマークデータセットを使用して、OrthoFinderが他の推論法よりも8%から33%正確であることを示す。 さらに、本発明者らは、植物中の転写因子遺伝子ファミリーの完全な分類を提供することによってOrthoFinderの有用性を実証し、これまでに観察されていない690万の関係を明らかにする。


 公式のGithubにとても丁寧な説明があるので、そちらをご覧ください。 

OrthoFinder/OrthoFinder-manual.pdf at master · davidemms/OrthoFinder · GitHub

簡単に言えば、blastを全部のfaaファイルに対して実行して(BLAST all-versus-all)、それでオーソロガスなタンパク質を検出している。そのため、比較するfaaファイルの数に応じて計算時間が累乗で増えていく。そして全てのオルソロググループに対してルート付きの系統樹を推定し、それらのツリーにおけるすべての遺伝子重複を特定することができる。比較ゲノム解析のための統計も出力される。


OrthoFinder公式サイト

http://www.stevekellylab.com/software/orthofinder


インストール

Github (ソースコードにexampleデータもあり)

#bioconda (link) python2.7 (python3 supported)
mamba install orthofinder -c bioconda -y

#homebrew
brew
install OrthoFinder

orthofinder

OrthoFinder version 2.5.4 Copyright (C) 2014 David Emms


SIMPLE USAGE:

Run full OrthoFinder analysis on FASTA format proteomes in <dir>

  orthofinder [options] -f <dir>


Add new species in <dir1> to previous run in <dir2> and run new analysis

  orthofinder [options] -f <dir1> -b <dir2>


OPTIONS:

 -t <int>        Number of parallel sequence search threads [Default = 128]

 -a <int>        Number of parallel analysis threads

 -d              Input is DNA sequences

 -M <txt>        Method for gene tree inference. Options 'dendroblast' & 'msa'

                 [Default = dendroblast]

 -S <txt>        Sequence search program [Default = diamond]

                 Options: blast, diamond, diamond_ultra_sens, blast_gz, mmseqs, blast_nucl

 -A <txt>        MSA program, requires '-M msa' [Default = mafft]

                 Options: mafft, muscle

 -T <txt>        Tree inference method, requires '-M msa' [Default = fasttree]

                 Options: fasttree, raxml, raxml-ng, iqtree

 -s <file>       User-specified rooted species tree

 -I <int>        MCL inflation parameter [Default = 1.5]

 -x <file>       Info for outputting results in OrthoXML format

 -p <dir>        Write the temporary pickle files to <dir>

 -1              Only perform one-way sequence search

 -X              Don't add species names to sequence IDs

 -y              Split paralogous clades below root of a HOG into separate HOGs

 -z              Don't trim MSAs (columns>=90% gap, min. alignment length 500)

 -n <txt>        Name to append to the results directory

 -o <txt>        Non-default results directory

 -h              Print this help text


WORKFLOW STOPPING OPTIONS:

 -op             Stop after preparing input files for BLAST

 -og             Stop after inferring orthogroups

 -os             Stop after writing sequence files for orthogroups

                 (requires '-M msa')

 -oa             Stop after inferring alignments for orthogroups

                 (requires '-M msa')

 -ot             Stop after inferring gene trees for orthogroups 


WORKFLOW RESTART COMMANDS:

 -b  <dir>         Start OrthoFinder from pre-computed BLAST results in <dir>

 -fg <dir>         Start OrthoFinder from pre-computed orthogroups in <dir>

 -ft <dir>         Start OrthoFinder from pre-computed gene trees in <dir>


LICENSE:

 Distributed under the GNU General Public License (GPLv3). See License.md


CITATION:

 When publishing work that uses OrthoFinder please cite:

 Emms D.M. & Kelly S. (2019), Genome Biology 20:238


 If you use the species tree in your work then please also cite:

 Emms D.M. & Kelly S. (2017), MBE 34(12): 3267-3278

 Emms D.M. & Kelly S. (2018), bioRxiv https://doi.org/10.1101/267914


テストラン

 ソースコードの中のテストデータを実行。4生物のタンパク質データ (.faa) がある。

git clone https://github.com/davidemms/OrthoFinder.git
cd OrthoFinder/
orthofinder -f Tests/Input/ExampleDataset -t 8

Statistics_Overall.csvに結果がまとめられている。 

kazumaxneo$ column -t -s',' Results_Aug01/Statistics_Overall.csv |head -20

Number of genes 2733

Number of genes in orthogroups 1938

Number of unassigned genes 795

Percentage of genes in orthogroups 70.9

Percentage of unassigned genes 29.1

Number of orthogroups 536

Number of species-specific orthogroups 7

Number of genes in species-specific orthogroups 102

Percentage of genes in species-specific orthogroups 3.7

Mean orthogroup size 3.6

Median orthogroup size 4.0

G50 (assigned genes) 4

G50 (all genes) 4

O50 (assigned genes) 199

O50 (all genes) 298

Number of orthogroups with all species present 278

Number of single-copy orthogroups 254

Date 2017-08-01

Orthogroups file Orthogroups.csv

Unassigned genes file Orthogroups_UnassignedGenes.csv

 2733遺伝子のうち1938でオルソログが見つかったと出ている。


公式のdockerイメージが用意されている。

https://hub.docker.com/r/davidemms/orthofinder

docker pull davidemms/orthofinder:latest

#help(v2.5.4)
docker run -it --rm davidemms/orthofinder:2.5.4 -h

#proteomeのfastaファイルが配置された1つ上のディレクトリに移動する
cd proteome_seqs/../

#dockerのrun。下のコマンドだとdiamondのall versus all blastが実行される。
docker run --ulimit nofile=1000000:1000000 -it --rm -v /<full_path>/<to>/<curret_path>:/input davidemms/orthofinder:2.5.4 orthofinder -f /input/proteome_seqs/

-M msaもつけると、MAFFTによる多重整列、FastTree による樹木推定まで実行される。タンパク質FASTAファイルの拡張子は".fa.faa.fasta.fas.pep"が自動で認識される。比較するfaaファイルの数に応じて計算時間が累乗で増えていくことと、メモリ使用量も増えることに注意。植物の250ゲノムのproteomeでは、256GBメモリでは足りなかった。


出力例

Orthogroups/にあるOrthogroups.GeneCount.tsvが各オルソロググループに属する遺伝子の数をまとめた行列ファイルになる。Gene_Trees/にはオルソログそれぞれの系統推定結果が配置されている。Orthogroup_sequences/にはオルソログの配列が配置されている。

3. Exploring OrthoFinder's results | OrthoFinder Tutorials


引用

OrthoFinder: solving fundamental biases in whole genome comparisons dramatically improves orthogroup inference accuracy

David M. Emms and Steven Kelly

Genome Biol. 2015; 16(1): 157. Published online 2015 Aug 6.


OrthoFinder の使い方 - Qiita

OrthoFinderを用いたOrthologous解析 - Qiita


関連


"-t 8"での計算時間は、バクテリアのfaaファイル5つで30分くらいかかった(mac pro 2009使用)。

2022 1/6 追記

最近のバージョンを使うとずっと早く計算は終わるようです。


古い説明

condaやbrewを使わない場合、1つずつ導入する。

  • fastme #ここからbinaryダウンロード。
chmod u+x fastme-2.1.5/binaries/fastme-2.1.5-osx #実行権
mv fastme-2.1.5-osx fastme #rename
#パスを通すかパスが通っている場所に移動。
  • pythonの依存 #ない人だけ
pip install numpy
pip install Shapely
pip install Matplotlib
#dlcpar-1.0.tarを解凍して中に入る。
sudo python setup.py install
  • MCL
brew install MCL


アセンブル結果をリードのアライメントパターンから評価する TransRate

2020 11/30 文章修正、help追加、condaによるインストールコマンド追加


 TransRateは、de novoトランスクリプトームアセンブリの品質をリファレンスフリーで評価するためのツールである。シークエンシングリードとアセンブリのみを入力として使用して、de novoトランスクリプトームアセンブリの複数の一般的なアーチファクトを容易に検出できる。これらには、キメラ、構造エラー、不完全なアセンブリ、塩基エラーなどが含まれる。TransRateはこれらのエラーを評価して各コンティグの診断品質スコアを作成し、これらのコンティグスコアを統合してアセンブリ全体を評価する。このように、TransRateは、de novoアセンブリのフィルタリングや最適化だけでなく、同じ入力リードから異なる方法で生成されたアセンブリの比較にも使用することができる。公開されている155のde novoトランスクリプトームアセンブリデータセットにこの手法を適用し、アセンブリの方法、リード長、リード量、リード品質がde novoトランスクリプトームアセンブリの精度に与える寄与を分解したところ、入力データの品質のばらつきが公開されているde novoトランスクリプトームアセンブリーの品質のばらつきの43%を説明していることが明らかになった。TransRateはリファレンスフリーなので、ロングノンコーディングRNA、rRNA、mRNA、混合RNAサンプルのアセンブリーを含む、あらゆるタイプのRNAアセンブリーの評価に適している。


 Translateはde novo transcriptomeの精度をリードのアライメントのされ方などから評価するツール。発表は2016年だが、すでにいくつかのペーパーに引用されている。BUSCOとTransRateでcore gene数とエラー率を見積もり、アセンブルの精度を担保した上で進めることが今後のde novo transcriptome解析の常套手段になるかもしれない。導入して動作をテストしていく。


マニュアル

Transrate - transcriptome assembly quality analysis


インストール

依存

  • blast+
  • snap-aligner #リードのアライメントに使う
  • bam-read
  • Salmon
#bioconda (link)
conda install -c bioconda -y transrate

#他の依存
transrate --install-deps all

#dockerhub(link)
docker pull arnaudmeng/transrate:1.0.3


---condaを使わない場合---

brewでbam-read以外は導入できる。

brew install snap-aligner
brew install blast
brew install salmon

 bam-readのダウンロード直リンク (TransRateマニュアルより)

[download: linux | mac]

解凍すると本体のbinaryのみできる。パスが通っている場所に移動させる。 

chmod u+x #実行権がなければ
sudo cp -i bam-read /usr/locan/bin/ #binに移動

 本体

Transrate - transcriptome assembly quality analysis

Binaryのみダウンロードできる。ファイル構造を壊すと動かなくなるので注意する。パスを通しておく。

echo "export PATH=$PATH:/Users/kazumaxneo/Documents/transrate-1.0.3-osx/" >> ~/.bash_profile #環境に合わせて変えてください
source ~/.bash_profile #ソースする

 > transrate

Transrate v1.0.3

by Richard Smith-Unna, Chris Boursnell, Rob Patro,

   Julian Hibberd, and Steve Kelly


DESCRIPTION:

Analyse a de-novo transcriptome assembly using three kinds of metrics:


1. sequence based (if --assembly is given)

2. read mapping based (if --left and --right are given)

3. reference based (if --reference is given)


Documentation at http://hibberdlab.com/transrate


USAGE:

transrate <options>


OPTIONS:

  --assembly=<s>            Assembly file(s) in FASTA format, comma-separated

  --left=<s>                Left reads file(s) in FASTQ format, comma-separated

  --right=<s>               Right reads file(s) in FASTQ format, comma-separated

  --reference=<s>           Reference proteome or transcriptome file in FASTA format

  --threads=<i>             Number of threads to use (default: 8)

  --merge-assemblies=<s>    Merge best contigs from multiple assemblies into file

  --output=<s>              Directory where results are output (will be created) (default: transrate_results)

  --loglevel=<s>            Log level. One of [error, info, warn, debug] (default: info)

  --install-deps=<s>        Install any missing dependencies. One of [read, ref, all]

  --examples                Show some example commands with explanations

docker

docker run --rm -itv $PWD:/data -w /data arnaudmeng/transrate:1.0.3
transrate -h


準備

Transrate - transcriptome assembly quality analysisから、テストファイルをダウンロードして解凍する。

3つファイルができる。

f:id:kazumaxneo:20170801105522j:plain


ラン

1、contigの基本統計を得る

de novo assemblyして得たtranscripts.fastaを分析する。

transrate --assembly transcripts.fa --threads 12

transrate_results/にCSVファイルのassemblies.csvとtrasncripts/contigs.csvができる。


assemblies.csvには配列の長さなどの基本情報が含まれている。Nの数や、GC含量のほか、アセンブリの指標に用いられるN50、N70なども計算されている。

f:id:kazumaxneo:20201201001514p:plain

詳細はTransrate - transcriptome assembly quality analysisのContig metricsを参照。


contigs.csvはcontigそれぞれの長さ、GC含量が計算、出力されている。columnコマンドに-sをつけて仕切りをCSVフォーマットの","と明示している。

user$ column -t -s',' transcripts/contigs.csv 

contig_name   length  prop_gc   orf_length

NM_001168316  2283    0.487516  533

NM_174914     2385    0.485535  567

NR_031764     1853    0.507285  221

NM_004503     1681    0.527662  235

NM_006897     1541    0.552239  260

NM_014212     2037    0.566519  304

NM_014620     2300    0.508261  264

NM_017409     1959    0.533435  342

NM_017410     2396    0.57596   330

NM_018953     1612    0.591811  229

NM_022658     2288    0.482517  242

NM_153633     1666    0.493998  279

NM_153693     2072    0.527992  153

NM_173860     849     0.666667  282

NR_003084     1640    0.560366  182

 このようにアセンブルして作ったcontigの要約統計を得ることができる。


、リード使いアセンブル精度を推測する。

 シーケンスリードを入力する。

transrate --assembly transcripts.fa --left left.fq --right right.fq --threads 20
  • --threads thread number

 リード数が多いと少し時間がかかる(e.g., 10GBx2のデータでCPU30指定だと1時間弱)。


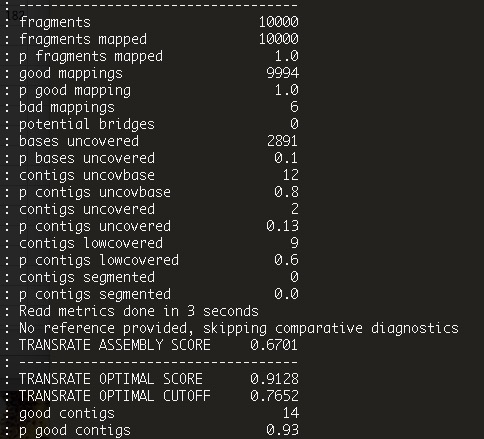
やっていることについては公式ページのRead mapping metricsを参考。解析が終了すると、標準出力にまとめの表が表示される。

f:id:kazumaxneo:20170801130827j:plain

例えば"n bases uncovered"はリードのマッピングがゼロになっている塩基の数である。詳細は公式マニュアルのRead mapping metrics 参照

ここで上の画面の下の方にあるTransrate assembly scoreに注目する。

 TRANSRATE ASSEMBLY SCORE     0.6701

リードを指定した時だけこのTransrate assembly scoreは計算される。Transrate assembly scoreはアセンブルデータ全体と各contigについて計算されていて、ここでは全体のスコアを見ている。高い方がベターで、1が最高である。よくこの数値がアセンブルの指標として論文で比較されたりする(比較が可能なのは、同一のシーケンスリードで評価したアセンブルデータ)。


他にcontig score、optimised assembly scoreなどがなる。詳細は論文と公式ページ(リンク)で確認してください。


出力ディレクトリには他にもたくさんのファイルができる。good.transcripts.faとbad..transcripts.faは、ペアリードの両方がアライメントされ、且つ向きも正しいか(-->  <--)、contig末端がオーバーラップしていないかなどを指標にcontig-scoreが出され、そのスコアにより選別されている。test dataでは10000 contingのうち6 がbadであった。


 補足

シーケンスリードによるアセンブルデータの分析は、使うシーケンスリードの精度に100%依存している。例えば使用したリードがlow qualityだったりアダプター配列が付いたままだったりすると、結果は大きく影響を受けてしまうので、オーサーらはアダプター配列トリミングとクオリティトリミングを行い、かつエラーコレクションも終わったデータを使うことを勧めている。

エラーコレクションは、例えばrnaspadesならBayesHammerでエラーコレクションされたリードがrnaspades出力ディレクトリのcorrect/にgz形式で保存されている。このようなリードを使うことを推薦している注; エラーコレクションはRNA用のものを使う必要がある。ゲノム用のエラーコレクションを使うと、k-mer coverageが低い低発現の情報が軒並み除去される恐れがある)。

リード数を(diginormなどで)ノーマライズしたデータを使う点については、公式サイトは使っても影響はないと主張している。ただしここではそういったことは行わない。 (蛇足)


transcripts.fasta_bam_info.csvの中身

f:id:kazumaxneo:20170801161446j:plain

goodかbadの指標になるデータがまとめられている。


contigs.csvの中身

f:id:kazumaxneo:20170801161347j:plain

先ほど標準出力された内容がcontigごとにまとめられている。


複数のfastaを同時に調べる。

transrate --assembly one.fa,two.fa

”," でサンプルを繋ぐ。


4、モデル生物の情報からアセンブル精度を推測する。

transrate --assembly transcripts.fa --reference ref.fa 

de novo transcriptomeならリファレンスのcDNA情報はないことになるが、近縁種(very closely)のゲノム情報が利用できるなら、それと比較してアセンブリ精度を確認することもできる。比較はblastで相同性を調べることで行われる。


補足

ここでref.faはシロイヌナズナのcDNA配列を指定しているが、植物では1種類の遺伝子に多くのパラログがあったりして、複数ヒットによりスコアが不当に低くなってしまうことが起こる。公式サイトは、single のtranscriptに絞った配列をJGIのphytozomeなどから入手し、それをリファンレスにすることを勧めている(Choosing a reference)。


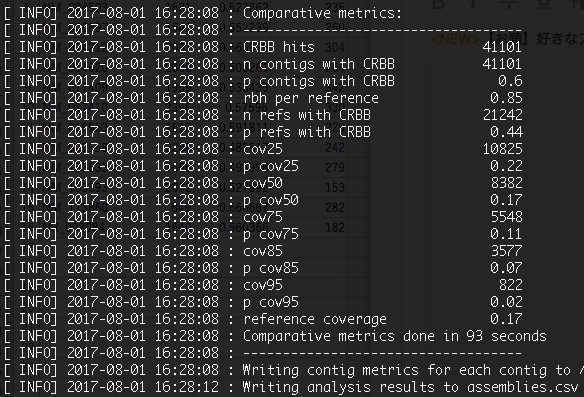
解析が終了すると、標準出力にまとめの表が表示される。

f:id:kazumaxneo:20170801163847j:plain

詳細は公式マニュアルのComparative metrics 参照。


transcripts_into_Arabidopsis_thaliana.TAIR10.cdna.all.1.blast

f:id:kazumaxneo:20170801164135j:plain

各々のcontigのblast結果がまとめられている。


contigs.csvの中身


f:id:kazumaxneo:20170801164310j:plain

先ほど標準出力された内容がcontigごとにまとめられている。


下のようなエラーが出た場合、

/home/transrate-1.0.3-linux-x86_64/lib/app/ruby/lib/ruby/gems/2.2.0/gems/bundler-1.7.12/lib/bundler/runtime.rb:222: warning: Insecure world writable dir /usr/local/bin/contig_Hunter/ in PATH, mode 040777

Dependencies are missing:

  - blastplus (2.2.[0-9])


transrate --install-deps ref

で依存パッケージをインストール(公式サイト説明 一番下)。


5、リードとリファンレンスを両方使いアセンブル精度を推測する。 

transrate --assembly transcripts.fa --left left.fq --right right.fq --threads 12 --reference ref.fa 


どのデータ使うかは、その解析によって変わってくる。最近nature Scientific Reports に発表された論文(リンク Table. 2)では、以下の8つの情報を使っている。

シーケンスリードから計算されるRead mapping metrics (#2)

  • % fragments mapped
  • % good mappings
  • % bases uncovered

リファンレンスから計算されるComparative metrics (#3)

  • % contigs with CRBB
  • % refs with CRBB
  • Reference coverage

総合的なスコア; TransRate score (#2)

  • TransRate assembly score
  • % good contigs


コマンドだけ打つとヘルプが出る。

transrate

           _                                        _

          | |_  _ __  __ _  _ __   ___  _ __  __ _ | |_  ___

░▓▓▓^▓▓▓░ | __|| '__|/ _` || '_ \ / __|| '__|/ _` || __|/ _ \ ░▓▓▓^▓▓▓░

░▓▓▓^▓▓▓░ | |_ | |  | (_| || | | |\__ \| |  | (_| || |_|  __/ ░▓▓▓^▓▓▓░

░▓▓▓^▓▓▓░  \__||_|   \__,_||_| |_||___/|_|   \__,_| \__|\___| ░▓▓▓^▓▓▓░


Transrate v1.0.3

by Richard Smith-Unna, Chris Boursnell, Rob Patro,

   Julian Hibberd, and Steve Kelly


DESCRIPTION:

Analyse a de-novo transcriptome assembly using three kinds of metrics:


1. sequence based (if --assembly is given)

2. read mapping based (if --left and --right are given)

3. reference based (if --reference is given)


Documentation at http://hibberdlab.com/transrate


USAGE:

transrate <options>


OPTIONS:

  --assembly=<s>            Assembly file(s) in FASTA format, comma-separated

  --left=<s>                Left reads file(s) in FASTQ format, comma-separated

  --right=<s>               Right reads file(s) in FASTQ format, comma-separated

  --reference=<s>           Reference proteome or transcriptome file in FASTA format

  --threads=<i>             Number of threads to use (default: 8)

  --merge-assemblies=<s>    Merge best contigs from multiple assemblies into file

  --output=<s>              Directory where results are output (will be created) (default: transrate_results)

  --loglevel=<s>            Log level. One of [error, info, warn, debug] (default: info)

  --install-deps=<s>        Install any missing dependencies. One of [ref]

  --examples                Show some example commands with explanations

uesaka-no-MacBook-Air-2:transrate-1.0.3-osx kazumaxneo$ 

 ユーザー目線で作られている。素晴らしい。


#注 リード数が多すぎると(150GBx2)計算が終わらない事がありました。その時はサブサンプリングしてリード数を減らすとランできました。


  • 配列数が数十万を超えるとsnapでエラーを起こすことがある。goodとbadの配列に分離したい場合、サブセットに対してコマンドを繰り返すか、先にほかのフィルタリングを実行して配列数を減らす。


引用

TransRate: reference-free quality assessment of de novo transcriptome assemblies.

Smith-Unna, R., Boursnell, C., Patro, R., Hibberd, J. M. & Kelly, S.

Genome Res. 26, 1134–1144 (2016).


 TransRateとBUSCOを使ってアセンブリを評価している論文

https://www.nature.com/articles/sdata2016131.pdf


de novo transcriptome向けのアノテーションツール; Trinotate

2018 10/30 コード修正

2019 10/11 インストール追記、関連ツールリンク追記

2019 10/12 help追記、

2020 2/1 間違ったdockerリンク消去


de novo transcriptomeのアノテーションツールとしてblast2GOがよく知られているが、Trinotateというツールが発表された(論文はまだ)。Trinotateは非モデル生物のデータにも対応したde novo transcriptome向けアノテーションツールである。解析・付与できるアノテーション情報は、blastの解析結果、hmmerのドメイン検索結果、SignalPによるトランジットペプチドの予測結果、TMHMMによる膜タンパク質の予測結果、eggNOG/protein/Kegg databasesによるオーソログ、GO、 keggデータベースの情報などである。

各ツールを使った解析が終わると、Trinotateは各アノテーション結果を統合してSQLiteのデータベースにまとめてくれる。デーベース化することで柔軟かつ高速に取り扱うことが可能になる。データベースを作ったら、Trinotateのツールでローカルサーバーを立てて、htmlベースでグラフィカルにGO解析を行うことができる。


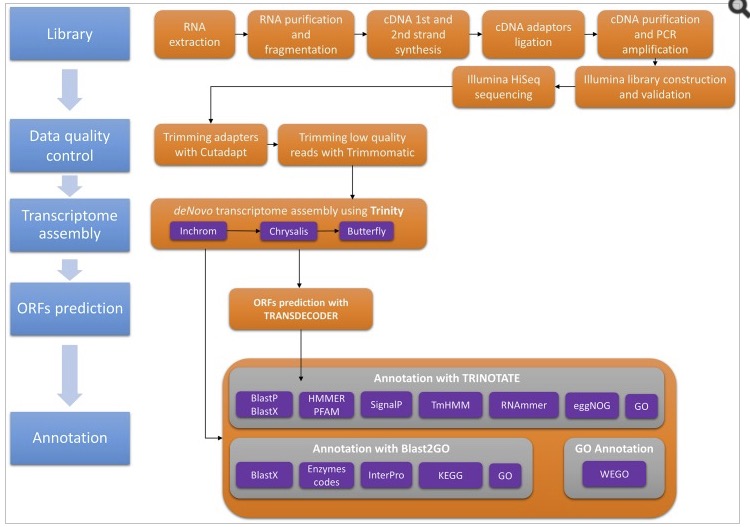
Blast2GOとの違いは、このペーパー

https://www.ncbi.nlm.nih.gov/pmc/articles/PMC4956038/#pone.0158565.ref026のFig .1がわかりやすいと思う。de novo transcriptome解析を行い、Blast2GOとTrinotateでアノテーションをつけている。

f:id:kazumaxneo:20170731210136j:plain

The De Novo Transcriptome and Its Functional Annotation in the Seed Beetle Callosobruchus maculatus より引用。


こちらも参考になる。

https://www.researchgate.net/post/Is_Trinotate_good_for_functional_annotation_of_de_novo_assembled_transcriptomes

 アノテーション情報を統合できるのは魅力的である。しかもblast2goの有償版と違いこちらは無料であり、高速に使えるなら心強い。論文発表前ではあるが、すでに7つの論文で使われている(リンクの一番下を参照)。導入して使い勝手をテストしてみる。問題がなさそうなら、普段の解析に取り入れることを目標に進める。


追記1; perlのライブラリを全て入れて、2017/12月の最新版を入れ直すと、最後までランできるようになりました。

追記2; condaを使って導入する。


まとめ直しました。


 インストール

追記

一部依存を除き、condaでインストールできる(リンク)。

#bioconda 依存が多いツールは仮想環境を作って導入するのが無難
conda create -n trinotate
conda activate trinotate
conda install -c bioconda trinotate

 >  autoTrinotate.pl -h

$ autoTrinotate.pl -h


##############################################################################

#

# Required:

#

#  --Trinotate_sqlite <string>                Trinotate.sqlite boilerplate database

#

#  --transcripts <string>                     transcripts.fasta

#

#  --gene_to_trans_map <string>               gene-to-transcript mapping file

#

#  --conf <string>                            config file

#

#  --CPU <int>                                number of threads to use.

#

#

##############################################################################


> Build_Trinotate_Boilerplate_SQLite_db.pl

$ Build_Trinotate_Boilerplate_SQLite_db.pl


usage: //anaconda3/envs/trinotate/bin/Build_Trinotate_Boilerplate_SQLite_db.pl Database_prefix [no_cleanup_flag]


以前苦労していた時==============================================

TMHMMがmacでは動かなかった(decodeanhmm.Linux_x86_64がlinux用にbuidされている)。cent OS6に導入する。

Trinotateのダウンロード(本体)

https://github.com/Trinotate/Trinotate/releases

perlのモジュールを適当な場所にコピーし、読み込めるようにしておく。

sudo cp -i ~/Trinotate-3.0.2/PerlLib/*pm /usr/share/perl5/

追記 

その他、不足している、動かないperlのライブラリがあったら、

https://sourceforge.net/p/trinotate/mailman/message/31312982/の解答を参考に導入してください。私はリンク先の質問者と同じライブラリが入っていませんでした。

依存するもの

  • blast+
  • Trinity(utilityツールも使う)- Trinitiyのアセンブルデータを使うように設計されている
  • TransDecoder - code領域探索
  • sqlite - データベース
  • NCBI BLAST+ - ホモロジー検索
  • tmhmm v2 - 膜タンパク質探索
  • RNAMMER - rNRA探索
  • HMMER - PFAMに対してドメイン探索
  • signalP v4 - シグナルペプチド切断領域の探索

 いくつかはbrewでインストールできる。"brew list"で確認し、持ってないツールだけ導入。

brew install blast
brew install trinity
brew install sqlite
brew install TransDecoder
brew install HMMER
brew install RNAMMER

注;Trinityのutil/も必要だが、brewでは入らない。

GitHub - trinityrnaseq/trinityrnaseq: Trinity RNA-Seq de novo transcriptome assemblyからダウンロードしておく。必要になる。

 Trinityと同じく、TransDecoderのutil/も必要になる。ダウンロードしておく。

Releases · TransDecoder/TransDecoder · GitHub


 以下はTransDecoder.Predictの371行目についてのエラーメッセージが出る人だけ。

cd-hit-estにパスが通っていても変な場所から取ってこようとしてバグが起こる。応急措置で

my ($cd_hit_est_exec) = &check_program('cd-hit-est');

 ↓

my ($cd_hit_est_exec) = 'cd-hit-est';

に修正。

 TMHMM、SignalPのインストールについては別にまとめています。こちらを参考にしてください。

TMHMM

SignalP

 RNAMMER、HMMER、TransDecorderはbrewで入ります。

============================================== 


データベースの準備

 データのダウンロード

cd Trinotate-3.0.2/ #移動
admin/Build_Trinotate_Boilerplate_SQLite_db.pl Trinotate #スクリプト実行

fam-A.hmm.gzuniprot_sprot.pepTrinotate.sqliteがダウンロードされる。Trinotate.sqliteは予めUniprotのデータ(SwissProt、Uniref90)からTrinotateでデータベース化されたファイルである。自分で準備する場合、Trinotateのツールで作ることになる。

 blastデータベースの準備

makeblastdb -in uniprot_sprot.pep -dbtype prot

pfamデータベースの準備

gunzip Pfam-A.hmm.gz #解凍
hmmpress Pfam-A.hmm #index作成

ここで一旦テストランを行う。

テストラン

Trinotateは複数のツールを走らせる上に、あまり堅牢な作りでないので少しのことでバグが出る。テストランを行ってエラーが出ないか確実に見極めて使う必要がある。


auto/testing/にTrinityでアセンブルされたデータが準備されている。

cd auto/testing/
ls -l #ファイルを確認

$ ls -l

total 8344

-rwxr-xr-x@ 1 user  staff      620  3  3 06:13 cleanme.pl

-rwxr-xr-x@ 1 user  staff     3929  3  3 06:13 conf.txt

-rwxr-xr-x@ 1 user  staff   170122  3  3 06:13 mini_sprot.pep.gz

-rwxr-xr-x@ 1 user  staff    63469  3  3 06:13 myTrinity.fasta.gene_to_trans_map.gz

-rwxr-xr-x@ 1 user  staff  4019376  3  3 06:13 myTrinity.fasta.gz

-rwxr-xr-x@ 1 user  staff      674  3  3 06:13 runMe.sh

myTrinity.fasta.gene_to_trans_map.gzmyTrinity.fasta.gzを解凍する。


.pepファイルのblastデータベースを作る。

makeblastdb -in mini_sprot.pep -dbtype prot


confファイルを編集する。auto/conf.txtの13行目から25行目が編集する箇所である。

13-25行目を以下のように編集した。

----------------------------------------------------------------------------------------------------

# ** edit the progs and dbs section to point to your local resources.


# progs

TRANSDECODER_DIR=/home/uesaka/TransDecoder-3.0-2.1/

BLASTX_PROG=blastx

BLASTP_PROG=blastp

SIGNALP_PROG=~/signalp-4.1/signalp

TMHMM_PROG=/usr/local/bin/tmhmm

RNAMMER_TRANS_PROG=/home/uesaka/Trinotate-3.0.2/util/rnammer_support/RnammerTranscriptome.pl

RNAMMER=~/.linuxbrew/bin/rnammer

HMMSCAN_PROG=hmmscan


# dbs

SWISSPROT_PEP=mini_sprot.pep

PFAM_DB=/home/uesaka/Trinotate-3.0.2/Pfam-A.hmm

----------------------------------------------------------------------------------------------------

プログラムのパスによって変えてください。


テストラン

perl ../autoTrinotate.pl  --Trinotate_sqlite ../../Trinotate.sqlite --transcripts myTrinity.fasta --gene_to_trans_map myTrinity.fasta.gene_to_trans_map --conf conf.txt --CPU 20
  • --Trinotate_sqlite   Trinotate.sqlite boilerplate database.
  •  --transcripts     Transcripts.fasta.
  • --gene_to_trans_map Gene-to-transcript mapping file.
  • --conf         Config file.
  • --CPU         Number of threads to use.

上記で指定しているファイルだが、--gene_to_trans_mapで指定しているGene-to-transcript mappingはtrinityのツールで作る。テストデータには最初から用意されている。--Trinotate_sqliteで指定しているTrinotate.sqliteは最初のデータベースの準備のところでダウンロードしたファイルである。中身はUniprotのデータ(SwissProt、Uniref90)をデータベース化したファイルになる。


Triniityでアセンブルされたcontigは15Mほどのサイズで、解析にはかなりの時間がかかる。終わるとExcelファイルで結果が出力される。


f:id:kazumaxneo:20180211151219j:plain


アノテーションできなかったセルや、ツールが正常に動作しなかったfeatureの列は"."で表示される 。その場合、公式の解説を真似してランできなかったツールだけ個別に走らせた方が早いかもしれない。


引用

The De Novo Transcriptome and Its Functional Annotation in the Seed Beetle Callosobruchus maculatus

 Ahmed Sayadi, Elina Immonen, Helen Bayram, and Göran Arnqvist*

 PLoS One. 2016; 11(7): e0158565. Published online 2016 Jul 21.


 解析の流れ

http://informatics.fas.harvard.edu/trinotate-workflow-example-on-odyssey.html


https://omictools.com/transcriptome-annotation-category


関連


膜貫通領域を予測する TMHMM

2019 12/18 インストール追記

2022/05/20 リンク更新


TMHMMは膜貫通領域を予測するツール。膜タンパク質であるかどうかの判定にも用いられる。


マニュアル

解凍したディレクトリにユーザーガイド(TMHMM2.0.html)あり。

TMHMM2.0


インストール

依存

その他、グラフィックの描画には追加でgnuplotなどをインストールする必要がある。ここでは説明しない。

tmhmm-2.0cの/bin/tmhmmとbin/tmhmmformat.plの1行目にあるperlのパスを修正する。まずperlの場所を確認する。

which perl 

/usr/bin/perlだったので、1行目をそのように修正。

次に/bin/decodeanhmm.Linux_x86_64をbinなどにコピーし、decodeanhmmという名前でシンボリックリンクを作る。

sudo cp bin/decodeanhmm.Linux_x86_64 /usr/local/bin/
sudo ln -s /usr/local/bin/decodeanhmm.Linux_x86_64  /usr/local/bin/decodeanhmm #シンボリックリンクをtmhmmが認識できるワードで作成

パスはコマンドの場所に応じて変えてください。


マニュアルにあるようにmodelのパスを明示してランすると動いたが、tmhmmを指定してランするとTMHMM2.0のモデル(tmhmm-2.0c/lib/TMHMM2.0.model)を読み込めなかった。

そこでbin/tmhmmの40-42行目のモデルのパスも以下のように修正した。

$opt_scrdir = "/home/uesaka/tmhmm-2.0c/bin" if (!defined($opt_scrdir));

$opt_bindir = "/home/uesaka/tmhmm-2.0c/bin" if (!defined($opt_bindir));

$opt_libdir = "/home/uesaka/tmhmm-2.0c/lib" if (!defined($opt_libdir));

これで動いた。あとはtmhmmにパスを通しておく。decodeanhmmと同じようにシンボリックリンクを貼ってもいい。

パスはコマンドの場所に応じて変えてください。


実行方法

 入力はマルチファスタに対応している。long出力。

tmhmm input.faa > output.txt

short 出力

tmhmm -short input.faa > output.txt


出力はlongとshortの2種類選べる。デフォルトのlongの出力は以下のようになる。


1、膜タンパク質と予測されなかった配列。

# IPI00000001.2 Length: 577

# IPI00000001.2 Number of predicted TMHs:  0

# IPI00000001.2 Exp number of AAs in TMHs: 0.0214

# IPI00000001.2 Exp number, first 60 AAs:  0.00037

# IPI00000001.2 Total prob of N-in:        0.00383

IPI00000001.2 TMHMM2.0 outside     1   577

最後の行がまとめである。ここが1行でoutsizeかinsideと出ていれば、膜貫通タンパク質ではない。

2、膜タンパク質と予測された配列。

# IPI00000012.4 Length: 496

# IPI00000012.4 Number of predicted TMHs:  6

# IPI00000012.4 Exp number of AAs in TMHs: 129.52753

# IPI00000012.4 Exp number, first 60 AAs:  39.60649

# IPI00000012.4 Total prob of N-in:        0.99612

# IPI00000012.4 POSSIBLE N-term signal sequence

IPI00000012.4 TMHMM2.0 inside     1    11

IPI00000012.4 TMHMM2.0 TMhelix     12    31

IPI00000012.4 TMHMM2.0 outside     32    40

IPI00000012.4 TMHMM2.0 TMhelix     41    60

IPI00000012.4 TMHMM2.0 inside     61    79

IPI00000012.4 TMHMM2.0 TMhelix     80   102

IPI00000012.4 TMHMM2.0 outside   103   114

IPI00000012.4 TMHMM2.0 TMhelix   115   134

IPI00000012.4 TMHMM2.0 inside   135   239

IPI00000012.4 TMHMM2.0 TMhelix   240   262

IPI00000012.4 TMHMM2.0 outside   263   276

IPI00000012.4 TMHMM2.0 TMhelix   277   299

IPI00000012.4 TMHMM2.0 inside   300   496

コメント行の下にあるIP~の行が膜貫通領域の予測結果。膜の内側か、外側か、膜の内部か予測されている。ただしあくまで予想である。


出力されているのは以下のような情報になる。


  • Length: the length of the protein sequence.
  • Number of predicted TMHs: The number of predicted transmembrane helices.
  • Exp number of AAs in TMHs: The expected number of amino acids intransmembrane helices. If this number is larger than 18 it is very likely to be a transmembrane protein (OR have a signal peptide).
  • Exp number, first 60 AAs: The expected number of amino acids in transmembrane helices in the first 60 amino acids of the protein. If this number more than a few, you should be warned that a predicted transmembrane helix in the N-term could be a signal peptide.
  • Total prob of N-in: The total probability that the N-term is on the cytoplasmic side of the membrane.
  • POSSIBLE N-term signal sequence: a warning that is produced when "Exp number, first 60 AAs" is larger than 10.


公式マニュアルより。


shortだと1行1クエリで出力される。

f:id:kazumaxneo:20170731143704j:plain

4行目のPredHel=6だと6回膜貫通を意味する。


webサービス 

https://services.healthtech.dtu.dk/service.php?TMHMM-2.0にアクセスする。


引用

Predicting transmembrane protein topology with a hidden Markov model: application to complete genomes.

Krogh A1, Larsson B, von Heijne G, Sonnhammer EL.

J Mol Biol. 2001 Jan 19;305(3):567-80. 


VCRU Bioinformatics - Install notes


DOI: 10.7875/togotv.2009.084

© 2016 DBCLS 統合TV / CC-BY-4.0


隠れマルコフモデル(HMM)のペアワイズアラインメントに基づいた高感度なタンパク質配列検索ツール HMMER

2019 6/25インストール追記, 12/17 タイトル修正

2020 7/12 help追加、タイトル修正, 7/14 helpとGitHubリンクを間違ったため差し替え, 8/11 ダウンロードリンクをカレントに修正

2022/04/07 インストール手順更新、06/24 論文引用、07/08 追記

2024/02/01 他のコマンド追記、マニュアルURL最新版に更新


HMMERはタンパク質のドメイン検索に使われるツール。Pfamなどのタンパク質ドメインのデータベースを使い、ドメインの検索を行ってアノテーションをつけることができる。ここではタンパク質配列をクエリとしてHMMプロファイルデータベースを検索するhmmscanを試す。他にも、多重配列アライメント(MSA)またはプロファイル HMM を入力とし、HMM のデータベース(PDB、Pfam、InterPro など)から相同タンパク質を検索するHHsearchなどがあある。


webサーバー

https://www.ebi.ac.uk/Tools/hmmer/

マニュアル

http://eddylab.org/software/hmmer/Userguide.pdf

hmmerブログ

https://cryptogenomicon.org/category/hmmer/


インストール

ダウンロードリンク

HMMER

Github

conda、brewで導入できる。

#bioconda (link)
mamba install -c bioconda -y hmmer

#homebrew
brew
install hmmer

 > hmmpress -h

$ hmmpress -h

# hmmpress :: prepare an HMM database for faster hmmscan searches

# HMMER 3.3 (Nov 2019); http://hmmer.org/

# Copyright (C) 2019 Howard Hughes Medical Institute.

# Freely distributed under the BSD open source license.

# - - - - - - - - - - - - - - - - - - - - - - - - - - - - - - - - - - - -

Usage: hmmpress [-options] <hmmfile>


Options:

  -h : show brief help on version and usage

  -f : force: overwrite any previous pressed files

hmmscan -h

$ hmmscan -h

# hmmscan :: search sequence(s) against a profile database

# HMMER 3.3 (Nov 2019); http://hmmer.org/

# Copyright (C) 2019 Howard Hughes Medical Institute.

# Freely distributed under the BSD open source license.

# - - - - - - - - - - - - - - - - - - - - - - - - - - - - - - - - - - - -

Usage: hmmscan [-options] <hmmdb> <seqfile>


Basic options:

  -h : show brief help on version and usage


Options controlling output:

  -o <f>           : direct output to file <f>, not stdout

  --tblout <f>     : save parseable table of per-sequence hits to file <f>

  --domtblout <f>  : save parseable table of per-domain hits to file <f>

  --pfamtblout <f> : save table of hits and domains to file, in Pfam format <f>

  --acc            : prefer accessions over names in output

  --noali          : don't output alignments, so output is smaller

  --notextw        : unlimit ASCII text output line width

  --textw <n>      : set max width of ASCII text output lines  [120]  (n>=120)


Options controlling reporting thresholds:

  -E <x>     : report models <= this E-value threshold in output  [10.0]  (x>0)

  -T <x>     : report models >= this score threshold in output

  --domE <x> : report domains <= this E-value threshold in output  [10.0]  (x>0)

  --domT <x> : report domains >= this score cutoff in output


Options controlling inclusion (significance) thresholds:

  --incE <x>    : consider models <= this E-value threshold as significant

  --incT <x>    : consider models >= this score threshold as significant

  --incdomE <x> : consider domains <= this E-value threshold as significant

  --incdomT <x> : consider domains >= this score threshold as significant


Options for model-specific thresholding:

  --cut_ga : use profile's GA gathering cutoffs to set all thresholding

  --cut_nc : use profile's NC noise cutoffs to set all thresholding

  --cut_tc : use profile's TC trusted cutoffs to set all thresholding


Options controlling acceleration heuristics:

  --max    : Turn all heuristic filters off (less speed, more power)

  --F1 <x> : MSV threshold: promote hits w/ P <= F1  [0.02]

  --F2 <x> : Vit threshold: promote hits w/ P <= F2  [1e-3]

  --F3 <x> : Fwd threshold: promote hits w/ P <= F3  [1e-5]

  --nobias : turn off composition bias filter


Other expert options:

  --nonull2     : turn off biased composition score corrections

  -Z <x>        : set # of comparisons done, for E-value calculation

  --domZ <x>    : set # of significant seqs, for domain E-value calculation

  --seed <n>    : set RNG seed to <n> (if 0: one-time arbitrary seed)  [42]

  --qformat <s> : assert input <seqfile> is in format <s>: no autodetection

  --cpu <n>     : number of parallel CPU workers to use for multithreads  [2]


実行方法

1,準備;タンパク質ドメインのデータベースを用意する必要がある。ここではPfamのデータベースを使う。

FTPサーバ Current release

ftp://ftp.ebi.ac.uk/pub/databases/Pfam/current_release/


Pfam.version.gzをダウンロードして開く。(2017年実行)

user$ gzcat Pfam.version.gz 

Pfam release       : 31.0

Pfam-A families    : 16712

Date               : 2017-02

Based on UniProtKB : 2016_10

31.0であることが確認できる。また、公式ページの通りPfam-Aが16712登録されていることが確認できる。


このPfam-Aをデータベースに使う。Pfam-A.hmm.gzをダウンロードして解凍する。

ftpサーバー current release

ftp://ftp.ebi.ac.uk/pub/databases/Pfam/current_release

#1 ダウンロード
wget ftp://ftp.ebi.ac.uk/pub/databases/Pfam/current_release/Pfam-A.hmm.gz

#2 解凍
gzip -dv Pfam-A.hmm.gz #解凍

#3 indexをつける(必須)
hmmpress proteins_hmm


========================================================

#補足 MSAからhmmファイルを自前で作る場合、hmmbuildコマンド&hmmpressコマンドを使う。 

#1 注:MSAはStockholm alignment formatが推奨されている。esl-reformatコマンドでmuscleやmafftからのMSAを変換する
esl-reformat stockholm protein.aln > protein.sto

#2 "出力名 MSA" の順に指定
hmmbuild proteins_hmm proteins_MSA.sto

#3 続いてHMM DBを作成
hmmpress proteins_hmm
=> indexなど4つのファイルができる。ランする時にこれを指定する。

4つのファイルができる。

pfam_database]$ ls -al Pfam-A.hmm.*

-rw-rw-r-- 1  uesaka  310624148 Jul 31 10:36 Pfam-A.hmm.h3f

-rw-rw-r-- 1  uesaka    1153233 Jul 31 10:36 Pfam-A.hmm.h3i

-rw-rw-r-- 1  uesaka  568043178 Jul 31 10:36 Pfam-A.hmm.h3m

-rw-rw-r-- 1  uesaka  668124941 Jul 31 10:36 Pfam-A.hmm.h3p

========================================================


2,hmmscanのランホモロジーサーチ)

hmmscan -o output.txt --cpu 1 -E 1e-10 Pfam-A.hmm input.faa
  • --cpu       Set the number of parallel worker threads to
  • -o       Direct the main human-readable output to a file
  • --tblout   Save a simple tabular (space-delimited) file summarizing the per-target output., with one data line per homologous target model found.
  • --domtblout Save a simple tabular (space-delimited) file summarizing the per-domain output, with one data line per homologous domain detected in a query sequence for each homologous model.

hmmscanのオプション(リンク)。


終わると以下のようなアライメントファイルが出力される。 

f:id:kazumaxneo:20170731114248j:plain


-oの代わりに--tbloutをつけると1行1クエリ形式になる。

hmmscan --domtblout output.txt --cpu 1 -E 1e-10 Pfam-A.hmm input.faa > log

#コメント削除
grep -v "#" output.txt

10タンパク質調べた例。


f:id:kazumaxneo:20170731115225j:plain


2022/07/08

TOP HITだけ保持する(引用)。hmmscan配列レベル出力(--tblout)はクエリごとにE-valueの低い順にプリントされる。先頭だけ取り出せばTOP HITが取り出せる。

hmmscan --tblout output --cpu 10 -E 1e-1 Pfam-A.hmm input.faa > log
awk '!x[$3]++' output > output_tophit
grep -v "#" output_tophit #コメント削除
  • --tblout    save parseable table of per-sequence hits to file <f>

  • --domtblout   save parseable table of per-domain hits to file <f>

output;2つのクエリ配列の結果。どちらのクエリ配列(3列目)も複数の配列がヒットしている。E-value列を見ると、どちらのクエリ配列もE-valueが低い順に並んでいる。

output_tophit;TOP HITがそれぞれのクエリ配列から取り出された。


他にもいくつかのコマンドがあります(wiki)。

(HMMER User’s Guideより)

引用

HMMER web server: interactive sequence similarity searching

Robert D. Finn,* Jody Clements, and Sean R. Eddy.

Nucleic Acids Res. 2011 Jul 1; 39(Web Server issue): W29–W37. Published online 2011 May 18. doi: 10.1093/nar/gkr367 PMCID: PMC3125773.


参考

Pfam | タンパク質ドメインファミリーのデータベース

HMMERを使ったPfamデータベースへのドメイン検索 - バイオインフォマティクス初心者の日常

hmmscan vs. hmmsearch speed: the numerology | Cryptogenomicon

https://www.biostars.org/p/10094/


関連

より高速

高速

https://kazumaxneo.hatenablog.com/entry/2024/02/01/235846


2022/06/24"Pfamが提供するモデルは、対象とする分類群から見て非常にgeneral(一般的)であることが多く、このような一般的なモデルでは、キングダム固有のモデルが提供するような特異性や選択性に欠ける可能性があることが以前から指摘されてた。本発表では、あるキングダムの分類群に対するHMMのドメインライブラリを作成するための一般的なアプローチを紹介する。”

(2007年の論文)


vFamsパイプライン

”RefSeqの全てのウイルス性タンパク質(非ファージ)からプロファイルHMMを構築するバイオインフォマティクスパイプラインを開発した”

(2014年の論文)

rRNAを探索する RNAMMER

2020 8/22 関連ツールリンク追記

2023/02/28 追記


fastaからrRNA配列を探すツール。アノテーションに使えるのはもちろんだが、それだけでなく、de novo transcriptome解析などで、rRNAにマッピングされるリードを排除するため、rRNAをもれなく検索したい時などにも使えると思われる。


webサーバー版(DISCONTINUED)

http://www.cbs.dtu.dk/services/RNAmmer/

 manual (DISCONTINUED)

http://www.cbs.dtu.dk/cgi-bin/nph-runsafe?man=rnammer

 usage

RNAmmer 1.2 Server

 出力フォーマット

http://www.cbs.dtu.dk/services/RNAmmer/output.php


インストール

brewでインストールできる。

brew install RNAMMER

以前はランにはhmmsearchのversion2が必要だったようだが、brewでインストールされる現行バージョンはHMMER 3.1b2の存在下で動作するようである。

 ダウンロード

http://www.cbs.dtu.dk/cgi-bin/sw_request?rnammer

test用のゲノムがある。 rRNA遺伝子のポジションが分かっている既知のゲノム配列を持っていれば、それを使って検証するとよい。


 実行方法

rnammer -S bac -m lsu,ssu,tsu -f output.fasta -gff output.gtf ecoli.fsa
  • -S Specifies the super kingdom of the input sequence. e.g., ani, arc
  • -m Molecule type can be 'tsu' for 5/8s rRNA, 'ssu' for 16/18s rRNA, 'lsu' for 23/28s rRNA or any combination seperated by comma. h hmmreport
  • -f fasta(出力)
  • -gff gff(出力)
  • -xml xml(出力)

最後に解析するfasta(input.fasta)を入力する。テストではsampleデータのE.coliゲノムを指定している。また検索したいrRNAのタイプを-mで指定している。ssuならSmall subunit。


解析が終わるとオプションで指定したファイルが出力される。上ではfastaとgtfを指定している。

output.fasta

user$ head -10 output.fasta

>rRNA_ecoli_section_21067-21181_DIR+ /molecule=5s_rRNA /score=86.3

TGGCGGCAGTAGCGCGGTGGTCCCACCTGACCCCATGCCGAACTCAGAAGTGAAACGCCG

TAGCGCCGATGGTAGTGTGGGGTCTCCCCATGCGAGAGTAGGGAACTGCCAGGCA

>rRNA_ecoli_section_16177-17706_DIR+ /molecule=16s_rRNA /score=1950.6

AGAGTTTGATCATGGCTCAGATTGAACGCTGGCGGCAGGCCTAACACATGCAAGTCGAAC

GGTAACAGGAAGAAGCTTGCTTCTTTGCTGACGAGTGGCGGACGGGTGAGTAATGTCTGG

GAAACTGCCTGATGGAGGGGGATAACTACTGGAAACGGTAGCTAATACCGCATAACGTCG

CAAGACCAAAGAGGGGGACCTTCGGGCCTCTTGCCATCGGATGTGCCCAGATGGGATTAG

CTAGTAGGTGGGGTAACGGCTCACCTAGGCGACGATCCCTAGCTGGTCTGAGAGGATGAC

CAGCCACACTGGAACTGAGACACGGTCCAGACTCCTACGGGAGGCAGCAGTGGGGAATAT

output.gtf

user$ head -10 output.gtf

##gff-version2

##source-version RNAmmer-1.2

##date 2017-07-30

##Type DNA

# seqname           source                      feature     start      end   score   +/-  frame  attribute

# ---------------------------------------------------------------------------------------------------------

ecoli_section RNAmmer-1.2 rRNA 21067 21181 86.3 + . 5s_rRNA

ecoli_section RNAmmer-1.2 rRNA 16177 17706 1950.6 + . 16s_rRNA

ecoli_section RNAmmer-1.2 rRNA 18068 20969 3754.0 + . 23s_rRNA

# ---------------------------------------------------------------------------------------------------------

他にもxmlやhmmerの分析 ファイルが出力可能となっている。xmlファイルはwebサーバーなどに使う。


2023/02/28追記

yookudaさんのdocker imageを使用させてもらう。

docker pull yookuda/rnammer-1.2:1.0
cd genome_dir/
docker rn --rm $PWD:/data -w /data yookuda/rnammer-1.2:1.0
> rnammer -S euk -m lsu,ssu,tsu -f output.fasta -gff output.gtf input_genome.fna

(ありがとうございます)


引用

RNAmmer: consistent and rapid annotation of ribosomal RNA genes

Karin Lagesen,1,2,* Peter Hallin,3 Einar Andreas Rødland,1,2,4,5 Hans-Henrik Stærfeldt,3 Torbjørn Rognes,1,2,4 and David W. Ussery1,2,3

Nucleic Acids Res. 2007 May; 35(9): 3100–3108.


関連


タンパク質のコード領域を推定する TransDecoder

2019 5/8 インストール追記, 11/29 インストール追記

2020 7/12 仮想環境を作ってインストールするように変更, help追記(コメントいただいたstepも修正しました。)。8/11 リンク追加、誤字修正

2023/01/01 追記、diamond 追記

2023/04/15 step2のコマンドの誤り修正

2023/11/15 追記


TransDecoderはアセンブリなどで作ったDNAもしくはcDNA配列からコード領域を見つけるツール。 RNA seq実験でdo novo assemblyした配列や、cuflinksなどのgenome guide assemblyなツールで作った配列からコード領域を探す時などに使われる。trinityや Trinotateにも取り込まれている。*1


マニュアル

https://transdecoder.github.io


インストー

Github

Bioconda (link)
mamba create -n TransDecoder -y
conda activate TransDecoder
mamba install -c bioconda -y TransDecoder

#homebrew
brew install TransDecoder
#hmmer(optional)

 > TransDecoder.LongOrfs -h

$ TransDecoder.LongOrfs -h


########################################################################################

#             ______                 ___                  __

#            /_  __/______ ____ ___ / _ \___ _______  ___/ /__ ____

#             / / / __/ _ `/ _\(_-</ // / -_) __/ _ \/ _  / -_) __/

#            /_/ /_/ \_,_/_//_/___/____/\__/\__/\___/\_,_/\__/_/   .LongOrfs

#                                                       

########################################################################################

#

#  Transdecoder.LongOrfs|http://transdecoder.github.io> - Transcriptome Protein Prediction

#

#

#  Required:

#

#    -t <string>                            transcripts.fasta

#

#  Optional:

#

#   --gene_trans_map <string>              gene-to-transcript identifier mapping file (tab-delimited, gene_id<tab>trans_id<return> ) 

#

#   -m <int>                               minimum protein length (default: 100)

# 

#   -G <string>                            genetic code (default: universal; see PerlDoc; options: Euplotes, Tetrahymena, Candida, Acetabularia)

#  

#   -S                                     strand-specific (only analyzes top strand)

#

#   --output_dir | -O  <string>            path to intended output directory (default:  basename( -t val ) + ".transdecoder_dir")

#

#   --genetic_code <string>                Universal (default)

#

#        Genetic Codes (derived from: https://www.ncbi.nlm.nih.gov/Taxonomy/Utils/wprintgc.cgi)

#

Acetabularia

Candida

Ciliate

Dasycladacean

Euplotid

Hexamita

Mesodinium

Mitochondrial-Ascidian

Mitochondrial-Chlorophycean

Mitochondrial-Echinoderm

Mitochondrial-Flatworm

Mitochondrial-Invertebrates

Mitochondrial-Protozoan

Mitochondrial-Pterobranchia

Mitochondrial-Scenedesmus_obliquus

Mitochondrial-Thraustochytrium

Mitochondrial-Trematode

Mitochondrial-Vertebrates

Mitochondrial-Yeast

Pachysolen_tannophilus

Peritrich

SR1_Gracilibacteria

Tetrahymena

Universal

#

#

#   --version                              show version tag (5.5.0)

#

#########################################################################################


TransDecoder.Predict -h

$ TransDecoder.Predict -h


########################################################################################

#             ______                 ___                  __

#            /_  __/______ ____ ___ / _ \___ _______  ___/ /__ ____

#             / / / __/ _ `/ _\(_-</ // / -_) __/ _ \/ _  / -_) __/

#            /_/ /_/ \_,_/_//_/___/____/\__/\__/\___/\_,_/\__/_/   .Predict

#

########################################################################################

#

#  Transdecoder.LongOrfs|http://transdecoder.github.io> - Transcriptome Protein Prediction

#

#

#  Required:

#

#   -t <string>                            transcripts.fasta

#

#  Common options:

#

#

#   --retain_long_orfs_mode <string>        'dynamic' or 'strict' (default: dynamic)

#                                        In dynamic mode, sets range according to 1%FDR in random sequence of same GC content.

#

# 

#   --retain_long_orfs_length <int>         under 'strict' mode, retain all ORFs found that are equal or longer than these many nucleotides even if no other evidence 

#                                         marks it as coding (default: 1000000) so essentially turned off by default.)

#

#   --retain_pfam_hits <string>            domain table output file from running hmmscan to search Pfam (see transdecoder.github.io for info)     

#                                        Any ORF with a pfam domain hit will be retained in the final output.

# 

#   --retain_blastp_hits <string>          blastp output in '-outfmt 6' format.

#                                        Any ORF with a blast match will be retained in the final output.

#

#   --single_best_only                     Retain only the single best orf per transcript (prioritized by homology then orf length)

#

#   --output_dir | -O  <string>            output directory from the TransDecoder.LongOrfs step (default: basename( -t val ) + ".transdecoder_dir")

#

#   -G <string>                            genetic code (default: universal; see PerlDoc; options: Euplotes, Tetrahymena, Candida, Acetabularia, ...)

#

#   --no_refine_starts                     start refinement identifies potential start codons for 5' partial ORFs using a PWM, process on by default.

#

##  Advanced options

#

#    -T <int>                            Top longest ORFs to train Markov Model (hexamer stats) (default: 500)

#                                        Note, 10x this value are first selected for removing redundancies,

#                                        and then this -T value of longest ORFs are selected from the non-redundant set.

#  Genetic Codes

#

#

#   --genetic_code <string>                Universal (default)

#

#        Genetic Codes (derived from: https://www.ncbi.nlm.nih.gov/Taxonomy/Utils/wprintgc.cgi)

#

#

Acetabularia

Candida

Ciliate

Dasycladacean

Euplotid

Hexamita

Mesodinium

Mitochondrial-Ascidian

Mitochondrial-Chlorophycean

Mitochondrial-Echinoderm

Mitochondrial-Flatworm

Mitochondrial-Invertebrates

Mitochondrial-Protozoan

Mitochondrial-Pterobranchia

Mitochondrial-Scenedesmus_obliquus

Mitochondrial-Thraustochytrium

Mitochondrial-Trematode

Mitochondrial-Vertebrates

Mitochondrial-Yeast

Pachysolen_tannophilus

Peritrich

SR1_Gracilibacteria

Tetrahymena

Universal

#

#  --version                           show version (5.5.0)

#

#########################################################################################


動作に必要なcd-hitもインストールされる。テストデータやユーティリティコマンド群を使うならソースコードもダウンロードする。

https://github.com/TransDecoder/TransDecoder/releases

git clone https://github.com/TransDecoder/TransDecoder.git
cd TransDecoder/util/

f:id:kazumaxneo:20200712180536p:plain

> perl gtf_genome_to_cdna_fasta.pl -h

$ perl gtf_genome_to_cdna_fasta.pl -h

usage: gtf_genome_to_cdna_fasta.pl cufflinks.gtf genome.fasta


perl gtf_to_alignment_gff3.pl

$ perl gtf_to_alignment_gff3.pl 

usage: gtf_to_alignment_gff3.pl cufflinks.gtf


実行方法

1、de novo assemblyで作ったfastaを使う。

sample-dataのTrinityのアセンブルデータからコード領域を探す。(TransDecoder-3.0.1/sample_data/simple_transcriptome_target/Trinity.fasta)。

step1

コード領域を探索する。

TransDecoder.LongOrfs -G universal -m 100 -t Trinity.fasta
  • -t transcripts.fasta
  • -m minimum protein length (default: 100)
  • -S strand-specific (only analyzes top strand)
  • -G genetic code (default: universal)

デフォルトでは100アミノ酸以上のORFが抽出される。strand specific sequenceなどでリード鎖が決まっている場合-Sをつける。

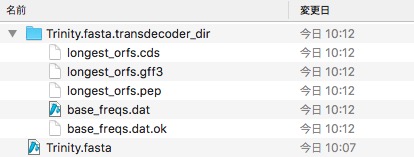
解析が終わると、Trinity.fasta.transdecoder_dir/ができる。中身は以下のようになった。

f:id:kazumaxneo:20170730101335j:plain

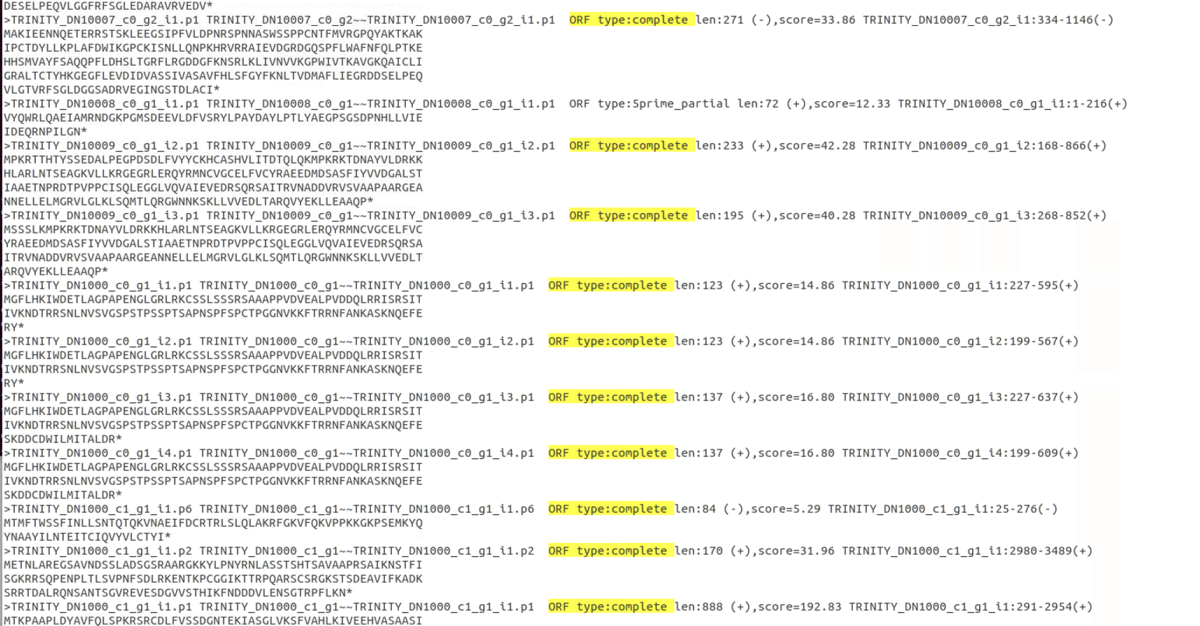
100アミノ酸以上になるcode領域を記載したgff3ファイルができる。またそのアミノ酸配列ファイル(.pep)もできている。


step2 (option)

見つかったコード領域をクエリにしてデータベースを検索。


blastxで相同なタンパク質を検索。(公式マニュアルの例)

blastp -query transdecoder_dir/longest_orfs.pep  -db uniprot_sprot.fasta  -max_target_seqs 1 -outfmt 6 -evalue 1e-5 -num_threads 10 > blastp.outfmt6

Pfamで相同なタンパク質を検索(データベース作成)。(公式マニュアルの例)(*2 databaseについて)

hmmscan --cpu 12 --domtblout pfam.domtblout /path/to/Pfam-A.hmm transdecoder_dir/longest_orfs.pep >& hmmscan_log
  • --cpu         Set the number of parallel worker threads to
  • --domtblout Save a simple tabular (space-delimited) file summarizing the per-domain output, with one data line per homologous domain detected in a query sequence for each homologous model.


追記

遅いならDIamond blasstpを使う(モデル生物から遠いなら推奨されない)。

diamond makedb --in plasnts_orthoDB.faa -d diamondDB
diamond blastp --query transdecoder_dir/longest_orfs.pep --db diamondDB --evalue 1e-5 --sensitive --max-target-seqs 1 --outfmt 6 --threads 30 > diamond.blastp.outfmt6


step3

blastやpfamの結果をもとに妥当なcode領域を選抜する。

TransDecoder.Predict -t target_transcripts.fasta --retain_blastp_hits blastp.outfmt6

#転写産物配列1つにつきベストの1つのみにするには"--single_best_only"をつける。
TransDecoder.Predict --single_best_only -t target_transcripts.fasta --retain_blastp_hits blastp.outfmt6
  • -t   transcripts.fasta
  • -G    genetic code (default: universal)
  • --retain_pfam_hits domain table output file from running hmmscan to search Pfam.
  • --retain_blastp_hits blastp output in '-outfmt 6' format.
  • --single_best_orf Retain only the single best ORF per transcript. (Best is defined as having (optionally pfam and/or blast support) and longest orf)


Trinity.fasta.transdecoder_dir/にさらに中間ファイルが作成され、最終的にカレントディレクトリに上記の条件を元に選ばれたcode領域と除去されたcode領域のスコアを記載したファイルが出力される(下の写真の一番上の4つのファイル)。

f:id:kazumaxneo:20170730101923j:plain

一番上に.bed、.gff3、.pep(fasta)、.cds(fasta)ができている。

gff3とbedには最終的に選ばれた領域を記載されている。また最終的に選ばれたコード領域のアミノ酸配列は.pepに記載され、コード領域の塩基配列は.cdsに記載され出力される。

この最終段階では選ばれなかったコード領域のアミノ酸配列は完全に除去されている。

igvで結果を確認する。

igv -g Trinity.fasta Trinity.fasta.transdecoder.bed

f:id:kazumaxneo:20170730102445j:plain

 太い部分が予想されたコード領域になる。


ORF type:completeとあるのが完全長(開始コドンとストップコドンがある)の配列。


2、genome guide assemblyで作った gtfファイルと参照したgenome配列を使う。

sample-dataのcufflinksのゲノムガイドアセンブルで作られたgtfからコード領域を探す。(TransDecoder-3.0.1/sample_data/cufflinks_example/)。

step1

gtfで指定した領域をfastaにして抽出する。

util/gtf_genome_to_cdna_fasta.pl transcripts.gtf test.genome.fasta > transcripts.fasta 

transcripts.fastaができる。このコマンドはgtfからfasta配列を作るツールとしても使えそうである。


step2

gff3も作る。最後に必要。

util/gtf_to_alignment_gff3.pl transcripts.gtf > transcripts.gff3

コマンドを間違って記載しておりました。修正しました。hosaka_TE様、ありがとうございます。(2023/04/15)。


step3

コード領域を探索する。de novo で始めた場合のstep1にあたる。

TransDecoder.LongOrfs -t transcripts.fasta

解析が終わると、transcripts.fasta.transdecoder_dir/ができる。

f:id:kazumaxneo:20170730103822j:plain


step4

妥当なcode領域を選抜する。de novo で始めた場合のstep3にあたる。

TransDecoder.Predict -t transcripts.fasta

#blastサーチ結果があるなら指定することで判定精度が上がる(任意)
TransDecoder.Predict -t stringtie2.fasta --retain_blastp_hits blast.outfmt6

カレントディレクトリに.gff3、.bed、.fasta、.cdsファイルが出力される。

f:id:kazumaxneo:20170730103927j:plain


step5

最後にゲノムベースのコード領域のアノテーションファイル(gff3)を作る。

util/gtf_to_alignment_gff3.pl transcripts.fasta.transdecoder.gff3 transcripts.gff3 transcripts.fasta > transcripts.fasta.transdecoder.genome.gff3

f:id:kazumaxneo:20170730104117j:plain


igvで結果を確認する。

igv -g test.genome.fasta transcripts.gtf,transcripts.fasta.transdecoder.genome.gff3

f:id:kazumaxneo:20170730104757j:plain

 上がcufflinksのmergeで作ったgtfファイル(transcripts.gtf)、下がコード領域を予想して最終的に得られたtranscripts.fasta.transdecoder.genome.gff3。太い部分が予想されたコード領域である。


igvについては以前紹介しています。

 こちらのツールも確認してみて下さい。


引用

De novo transcript sequence reconstruction from RNA-Seq: reference generation and analysis with Trinity

Brian J. Haas,#1,# Alexie Papanicolaou,#2 Moran Yassour,1,3 Manfred Grabherr,4 Philip D. Blood,5 Joshua Bowden,6 Matthew Brian Couger,7 David Eccles,8 Bo Li,9 Matthias Lieber,10 Matthew D. MacManes,11 Michael Ott,2 Joshua Orvis,12 Nathalie Pochet,1,13 Francesco Strozzi,14 Nathan Weeks,15 Rick Westerman,16 Thomas William,17 Colin N. Dewey,9,18 Robert Henschel,19 Richard D. LeDuc,19 Nir Friedman,3 and Aviv Regev1,20,#

Nat Protoc. 2013 Aug; 8(8): 10.1038/nprot.2013.084.


関連


*1

サポートされているgenetic code (v 3.01)

universal (default)

Euplotes

Tetrahymena

Candida

Acetabularia

Mitochondrial-Canonical

Mitochondrial-Vertebrates

Mitochondrial-Arthropods

Mitochondrial-Echinoderms

Mitochondrial-Molluscs

Mitochondrial-Ascidians

Mitochondrial-Nematodes

Mitochondrial-Platyhelminths

Mitochondrial-Yeasts

Mitochondrial-Euascomycetes

Mitochondrial-Protozoans

デフォルトではuniversalになっており、-Gで変更できる。


*2

ここではデータベースとしてPfam FTPサーバ (link/pub/databases/Pfam/current_release)からPfam-A.hmm.gzをダウンロードして使用した(Pfam-A.fullではない方)。hmmfetchコマンドが使えると思われるが、ここでは手動で実行した。

wget ftp://ftp.ebi.ac.uk/pub/databases/Pfam/current_release/Pfam-A.hmm.gz

#full
wget ftp://ftp.ebi.ac.uk/pub/databases/Pfam/current_release/Pfam-A.full.gz

解凍してindexを作成

hmmpress Pfam-A.hmm